In the present age of cybercrimes and their activities dominating the pages of headlines, especially in the IT-related industry, it becomes imperative to take extra measures to ensure the security of your servers. And in fact, one of the most effective security measures at this point is to entirely upgrade your security systems with an additional layer of security to the servers.
7 Steps to Set Up and Use Ubuntu Security Firewall: A Step-by-Step Guide
When you enhance the security of your server, it doesn’t only protect the server but also ensures the safety and security of your data. How do you achieve this efficiently? Configure UFW in Ubuntu 18.04 VPS or Ubuntu 20.04
-
-
7 Steps to Set Up and Use Ubuntu Security Firewall: A Step-by-Step Guide
- Step 1: Protecting Your Server with the Ubuntu Firewall
- Step 2: Configuring the Firewall with Uncomplicated Firewall on Ubuntu 18.04
- Step 3: Setting System Firewall Rules on Ubuntu 18.04 with Sudo UFW
- Open Ports
- Step 4: Working with Services on Ubuntu Firewall
- Step 5: Allow or Deny IP Address Connections
- Step 6: Deleting UFW Rules
- Step 7: Disabling or Resetting UFW (Optional)
-
7 Steps to Set Up and Use Ubuntu Security Firewall: A Step-by-Step Guide
A Firewall is described as an effective tool for monitoring and filtering network traffic, whether incoming or outgoing. Firewalls usually work by putting a set of security regulations in place to determine whether to block or allow specific traffic. With firewalls, you will have complete control over your server's incoming and outgoing connections. In this piece, we’ll take you through everything you need to know about configuring a firewall with UFW on Ubuntu 18.4
Ready? Let’s get started:
Step 1: Protecting Your Server with the Ubuntu Firewall
As mentioned earlier, firewalls are simply computer software or hardware. Their primary purpose is to monitor and control your server's inbound and outbound traffic. When it comes to ensuring an additional layer of security to your server, consider firewalls an essential element. More importantly, having an internet-connected computer indicates that you must set up a firewall for your server

For instance, Linux is an open-source system with one of the most secure operating systems. They are usually configured with built-in security features. However, like any software, it isn’t perfect and can be vulnerable to exploits. That’s why installing an additional layer of security is essential because you can never be too careful
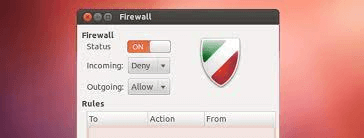
Therefore, Ubuntu has a built-in application that makes configuring a firewall much more accessible and hassle-free. It is known as the Uncomplicated Firewall (UFW) but is presented as Iptables. In addition, you’ll discover that the UFW on Ubuntu is installed by default but will most likely be disabled. That’s why UFW has another graphical interface, the GUFW, which can be installed seamlessly in a desktop environment
Step 2: Configuring the Firewall with Uncomplicated Firewall on Ubuntu 18.04
As we’ve mentioned earlier, Ubuntu 18.04 usually has the Uncomplicated Firewall (UFW) built-in by default, but it won’t be enabled. So, the very first step is to enable UFW.
How do you do this? Let’s take you through the step-by-step process:
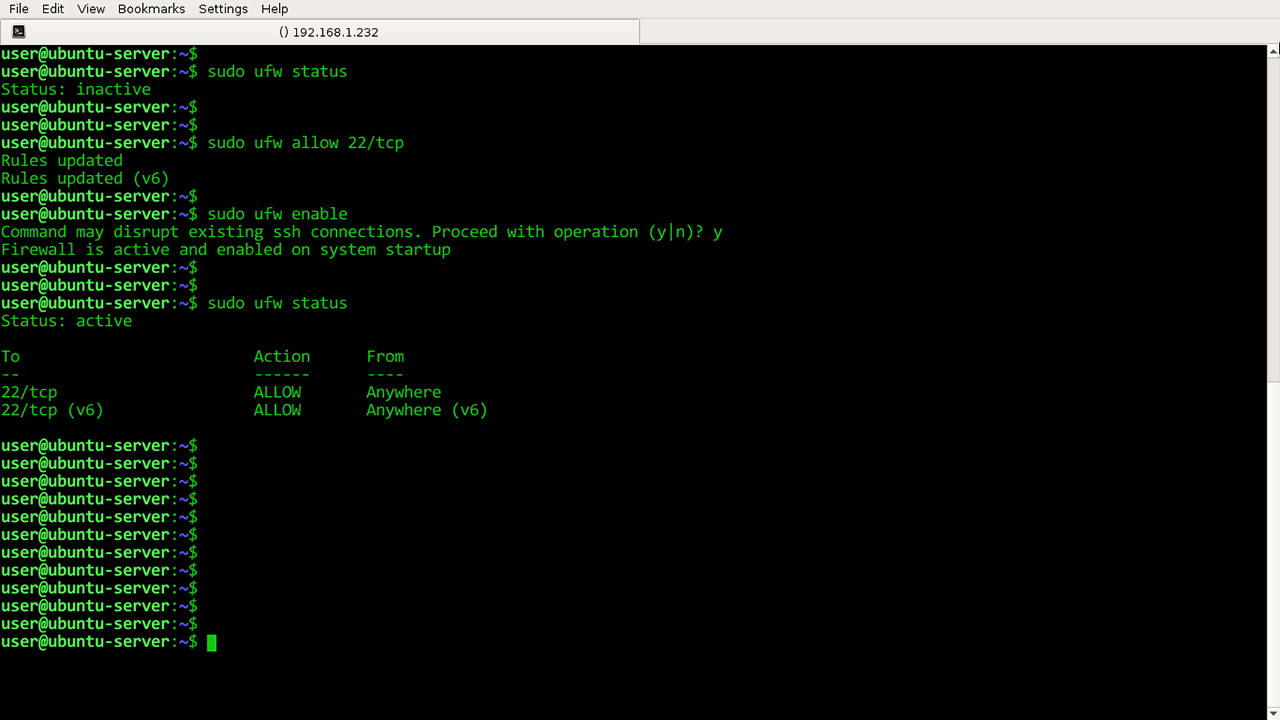
Firstly, connect the virtual private server, often shortened as the VPS, through specific SSH connections. Alternatively, if your Ubuntu is being run locally, you can click the VPS by opening a terminal
ssh your-user@your-server
Once you’ve gained the proper access to the server through the ssh access, you can then enable UFW. Run the following command:
sudo ufw enable
After running this command, you should gain immediate access to the Ubuntu server. If you are faced with errors such as “command not found,” you must install the UFW using a different command. Follow this prompt:
sudo apt-get install ufw
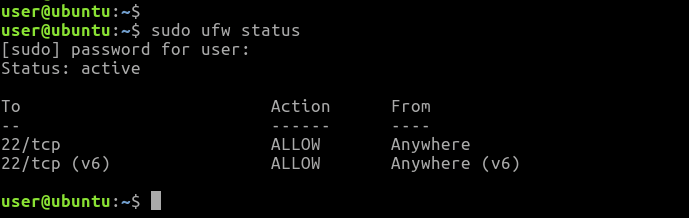
After the installation, run the following command to check the ufw status:
sudo apt-get install ufw
As displayed on your sudo ufw app list, UFW will be enabled
Remember, the default firewall settings allow outgoing connections and deny all incoming connections. This firewall configuration may be suitable for many users. However, if you have applications and other network services, you can establish some rules that cover your network services
Let’s take a look at establishing some rules!
Step 3: Setting System Firewall Rules on Ubuntu 18.04 with Sudo UFW
Firewall rules are a set of rules used as access control mechanisms. These rules are set up to safeguard your network from harmful and unauthorized applications and access. With system firewall rules and the ufw configuration file, you’re automatically configuring UFW to allow all outgoing connections and deny all incoming connections.
As a result, anyone attempting to reach your server will be denied from connecting, while any application within the server will be allowed to go into the outside world
Firewall rules shape how a firewall works as they determine the specific connection to access or deny.
Open and Close Ports with UFW Uncomplicated Firewall
The ports serve as connection interfaces, especially when connecting an application and the server. With UFW, opening and closing these specific ports seems easy and hassle-free.
Open Ports
To open a port, you need to run a set of commands, which are:
sudo ufw allow [port/protocol]
Add Specific Protocols
As displayed, there is a column to add the specific protocols. So, depending on your specific needs, these protocols can either be UDP or TCP. For instance, see the command below:
sudo ufw allow 56/tcp
With this command, you are setting a rule for the UFW to allow all applications and services to connect to the server via port 56.
Close Ports
You can also deny access with another command. Take a look at the command below:
sudo ufw deny 56/tcp
Unlike the earlier command, all applications and services attempting to connect to the server via port 56 will be disallowed
Alternatively, you can allow or deny access to the server using a single command. This is mainly used if you want to save time using the following prompt:
sudo ufw allow/deny [Starting_port: Ending_port]/protocol
After that, you can open a port with a different prompt:
sudo ufw allow 300:310/tcp
Or to deny access, the command would look like the following:
sudo ufw deny 300:310/tcp
Step 4: Working with Services on Ubuntu Firewall
The UFW can enforce a wide range of services and applications. The only challenge will be how to manage these applications and services. One surefire way is to identify the port with which the applications and services are connected to the server
Let’s use HTTP as an example. This service requires port 80, while the HTTPS counterpart has port 443 available. So, whenever you want to run a command for HTTP, use the following command:
sudo ufw allow http
As you can see, the command is equivalent to enabling port 80, as explained.
So, identifying the port with which the network services are connected to the server is essential
Step 5: Allow or Deny IP Address Connections
With UFW, you can also allow or deny access to specific IP addresses. To do this, you need to execute the following ufw command:
sudo ufw deny from IP ADDRESS
Let’s replace “IPADRESS” with a specific address:
sudo ufw allow from 192.168.1.3
If you’ve not altered the sudo ufw default policy to allow incoming connections, UFW is usually configured not to grant permission and access to all incoming connections by default. That’s why it is essential to create default firewall rules that will help secure your server and allow specific ports and IP addresses without ip masquerading.
However, there are times when the server will be attacked, and you would want to protect your system by denying specific HTTPs connections based on their source IP addresses or subnet. More so, altering your default policy on your server to allow all incoming connections isn’t advisable. Hence, you also need to create rules that deny any specific IP addresses or services that threaten your server
To establish deny rules, you can use the following command:
sudo ufw deny from 192.168.1.2
Specific IP Addresses
Working with UFW also allows you to specify which port you want the IP address to be connected to. Let’s say you want to allow specific IP addresses, such as home IP or work IP addresses, to connect to your server; use the following command:
sudo ufw allow from [IP_ADDRES] to any port [PORT]
Using a practical and real-world example, the command will follow the same sequence like this:
sudo ufw allow from 192.168.1.4 to any port 44.
With this, the IP address will only establish the connection if it uses port 44 as entered in the command
Subnets
If you grant permission to a subnet of specific IP addresses, you need to specify a netmask through CIDR notation. For instance, let’s assume you’re giving access to IP addresses ranging from 203.0.113.1 to 203.0.113.254; use this prompt:
sudo ufw allow from 203.0.113.0/24
To allow easy access, you can specify the destination port of that particular subnet 203.0.113.0/24. Let’s use ssh port 22 as an example in this case. Take a look at the command:
sudo ufw allow from 203.0.113.0/24 to any port 22
Connections to a Specific Network Interface
As we’ve mentioned earlier, firewall rules are highly essential. If, for instance, you want to create a firewall rule that will only apply to a specified network interface, you can do this by being specific with the command “allow in on.” Then, you will type the name of your particular network interface
This requires that you double-check your network interface before you proceed, using this command:
ip addr
Output Excerpt
2: eth0: <BROADCAST,MULTICAST,UP,LOWER_UP> mtu 1500 qdisc pfifo_fast state
. . .
3: eth1: <BROADCAST,MULTICAST> mtu 1500 qdisc noop state DOWN group default
. . .
As you can see from the result, the names of the output expert are highlighted and displayed. You will typically see names like eth0 or enp3s2
If, for instance, you’re using a server with a public network interface with the name eth0, it implies that you will use (port 80) as the HTTP traffic in the command. Check it out here:
sudo ufw allow in on eth0 to any port 80
That way, you can receive HTTP connections from the public internet on your server. You can also use a specialized database like the MySQL server, which has a (port 3306). This will help listen to allow connections on the private network interface eth1. For instance, you could do that with this prompt:
sudo ufw allow in on eth1 to any port 3306
This command means that other servers on your private network can connect to the MySQL database
Step 6: Deleting UFW Rules
Apart from the knowledge of creating ufw rules, you also need to know how to delete rules.
Deleting rules can be made in two different ways. The first is to delete the rules by rule number or the actual rule. Let’s briefly examine how to delete rules by rule number:
Deleting Rules by Rule Number
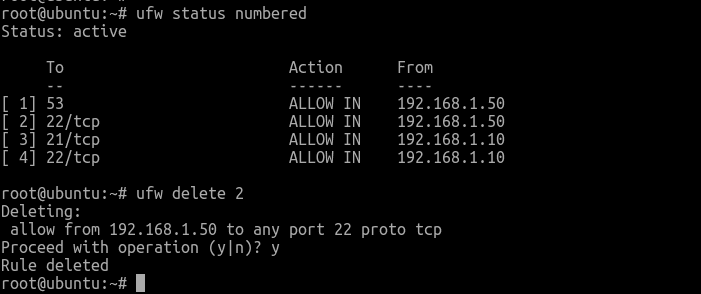
The first process of deleting rules by rule number is to get a list of your firewall rules. With the command stated below, the UFW will present numbers next to each rule, as demonstrated below:
sudo ufw status numbered
Numbered Output:
Ufw Status: active
To Action From
-- ------ ----
[ 1] 22 ALLOW IN 15.15.15.0/24
[ 2] 80 ALLOW IN Anywhere
For instance, if you want to delete the number 2 rule, you can specify in your UFW delete rule command as demonstrated below:
sudo ufw delete 2
Then, a prompt seeking your confirmation will be displayed on your screen, and you will delete rule 2, which allows HTTP connections
By Actual Rule
This is an alternative to the delete rule by number, as it allows you to specify the rule you want to delete. Let’s take the allow HTTP, for example, using this command:
sudo ufw delete allow http
Furthermore, if you do not want to use the service name, you are allowed to specify the rule by allowing 80, as shown here:
sudo ufw delete allow 80
Step 7: Disabling or Resetting UFW (Optional)
You can simply decide to disable ufw using this command:
sudo ufw disable
After running this command, you will see that everything you created with UFW will no longer be active. Enabling Ufw later requires that you run the following command:
sudo ufw enable
Would you choose to start all over after having UFW configured, reset by using this command:
sudo ufw reset
Voila! All UFW and the set rules that were earlier defined will be disabled. However, you should be mindful that sudo ufw default policies would not impact their control firewall settings, provided they are modified at any point. You will only have a fresh start with UFW
Frequently Asked Questions
Does Ubuntu Server have a firewall?
Yes. Ubuntu has a preinstalled firewall known as ufw. It is the default firewall and was developed to ease the Firewall's configuration for iptables, thus providing an intuitive, user-friendly, and host-based Firewall.
Do I need to Enable the Ubuntu UFW?
No. You do not need to enable the Firewall unless you’re carrying out advanced tests and configurations with some kind of server application on your system. This could include game servers, web servers, and more.
Does Linux Have a Firewall?
Yes. Linux has its own Firewall. However, it is deactivated by default. However, you should ensure that the native Firewall is activated before installing a new Linux firewall.
Which Firewall is Used in Linux?
Linux uses a built-in firewall known as iptables. Being an efficient and user-friendly firewall, it allows users to personalize the tables offered by the Linux Kernel firewall using the iptables commands. Its primary function is to inspect both inbound and outbound network traffic and decides whether to filter or pass out the traffic.
Which Firewall is the best for Linux?
IPFire is the best open-source Firewall for Linux in 2023. It is easy to use, has multiple deployment processes, and is more approachable than its peers. Similarly, its simple setup and installation process allows users to customize their networks into different color-coded security segments. In addition to its firewall features, IPFire also has an intrusion detection and prevention capacity and can be used to offer facilities for Virtual Private Networks (VPNs).
How Do I Find My UFW Status in Ubuntu?
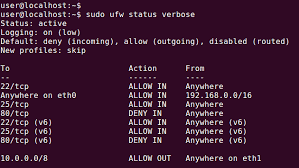
To check your ufw firewall status in Ubuntu, use the sudo ufw status command. The firewall rules will be displayed if the firewall is active. If, on the other hand, the Firewall is inactive, the response “status: inactive” will be displayed on your screen. Use the sudo ufw status verbose option if you want a clearer picture.

Azeezah Ayodolapo Alausa is an SEO website content writer and copywriter with 5+ years of experience creating high-quality blog posts about android, and website content for clients across multiple sectors art & culture, technology, e-commerce, finance, and more. She helped her clients boost engagements and conversion rates by 50%.

.png)