A major advancement in the field of remote access, virtual network computing (VNC) provides a practical means of interacting with various graphical desktop sharing system user interfaces. Fundamentally, it uses an advanced remote frame buffer protocol, a technological achievement that makes reliable client-server communication possible. This protocol guarantees safe data transfer across many operating systems, in addition to highlighting VNC's adaptability. When it comes to a range of remote graphical desktop environments and sharing system access scenarios, VNC is an incredibly flexible and dependable technology.
VNC positions itself as a secure remote communication environment and is well-known for its unwavering dedication to security and dependability. VNC is the best option for anyone looking for remote access without sacrificing security because of its commitment to ensuring the privacy and accuracy of data.
-
- Prerequisites:
- Step 1: Configuring the VNC Server and Desktop Environment on Your System:
- Step 2: Configuring the VNC server for Xfce Desktop Environment:
- Step 3: Establishing a Secure VNC Desktop Connection:
- Step 4: Setting Up a Systemd Service for VNC Server Ubuntu:
- The Revolutionary Effect of VNC Servers on Collaborative Computing and Remote Management:
Choosing the best VNC tool is like choosing the ideal tool from a toolbox. Users may customize their remote access experience with VNC tools like Xfce, TightVNC, RealVNC, and UltraVNC, utilizing the unique characteristics of each program for increased effectiveness and functionality.
Starting the trip involves creating a secure connection via an SSH tunnel, which sets up the groundwork for users to interact with the server's graphical desktop environment without any issues.
There are several advantages to the deliberate integration of TightVNC with the Ubuntu 20.04 server. TightVNC functions effectively without significantly using the computer's resources, making it an exceptional option that surpasses the fundamentals of remote access. This guarantees a smooth and agile user experience, even in situations when internet connections are slower. Performance is emphasized, which highlights TightVNC as a dependable option for those who value speed and security in their remote computing operations.
The discussion that follows in this article covers the specifics of the security features included in SSH tunnels in addition to providing useful knowledge for configuring TightVNC. Because the material is carefully designed to accommodate users with different levels of technical expertise, it is both instructional and easy to use when turning an Ubuntu 20.04 server into a TightVNC-capable powerhouse.
Following the installation of the TightVNC server, users may use a local VNC client program to begin graphical desktop interactions with the Ubuntu 20.04 server.
Users are introduced to a visually appealing and user-friendly environment for resource management, file manipulation, program configuration, and setting adjustments through this smooth interaction between the server and client.
Despite the numerous advantages of VNC, users are advised to think about possible bandwidth implications. In order to overcome obstacles and guarantee a quick data transmission process, the article emphasizes the need to find a balance by choosing greyscale screens and lower screen resolutions.
Prerequisites:
-
A server running Ubuntu 20.04, including a non-root user and a firewall configured with UFW.
-
Make sure that your computer has a VNC client that supports SSH tunnel connections.
Options for VNC on the Windows OS include RealVNC, UltraVNC, and TightVNC. Use RealVNC or the built-in Screen Sharing Program on Mac OS. Consider Xfce, RealVNC, or TightVNC for Linux.
Step 1: Configuring the VNC Server and Desktop Environment on Your System:
There is no VNC server or graphical desktop environment pre-installed on Ubuntu 20.04 servers. You may install these necessary components with the help of the instructions in this tutorial.
A quick and light setup is guaranteed by selecting the most recent TightVNC package and Xfce desktop environment from the official Ubuntu repository. Even with slower internet connections, this choice is perfect for establishing a steady and fluid VNC connection.
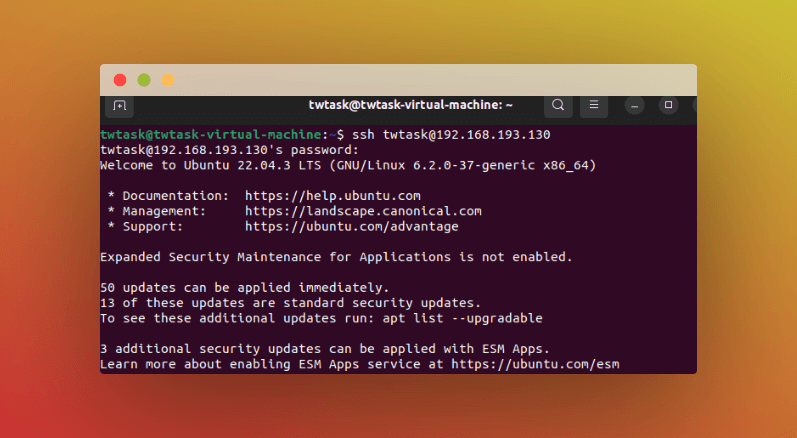
Start by establishing an SSH connection to your server:
The command 'ssh username@serveripORhostname' is usually used to establish a secure shell connection to a server.
This is an explanation of the command:
-
SSH: The command line utility for SSH protocol connections to distant servers.
-
Username: Your username on the remote server.
-
serveripORhostname: The server's IP address or hostname that you want to connect to.
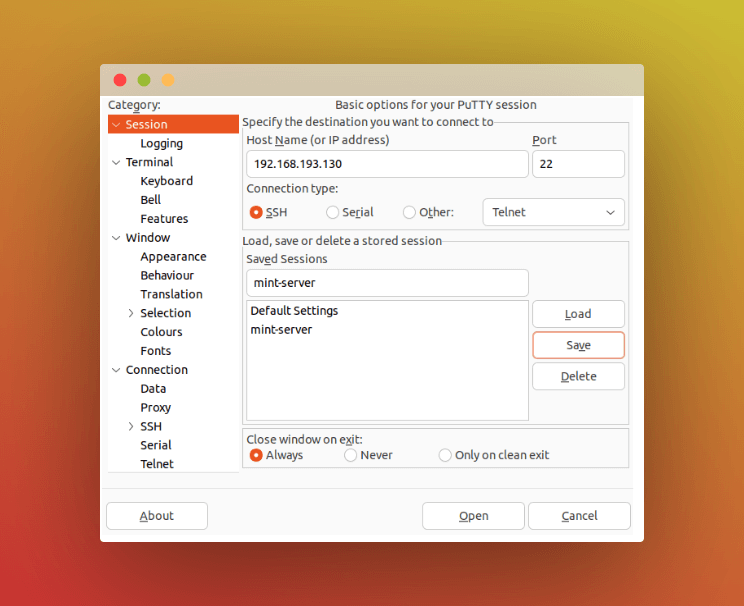
In my case, the username is twtask, and the server IP is 192.168.193.130.
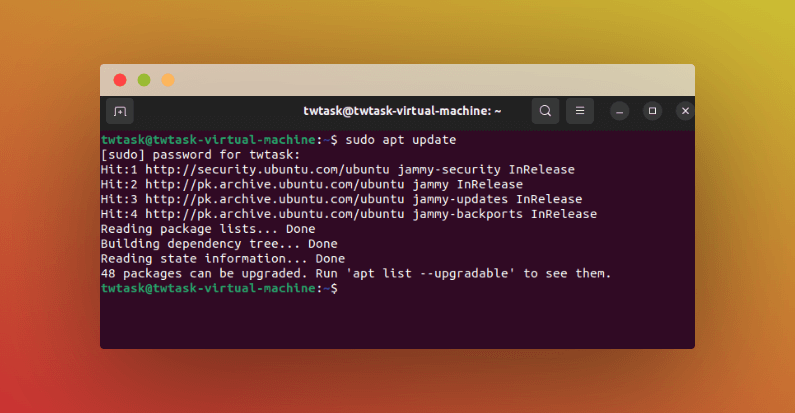
Then, update your package list by following the instructions. This smooth desktop environment and VNC server installation will optimize your Ubuntu 20.04 server.
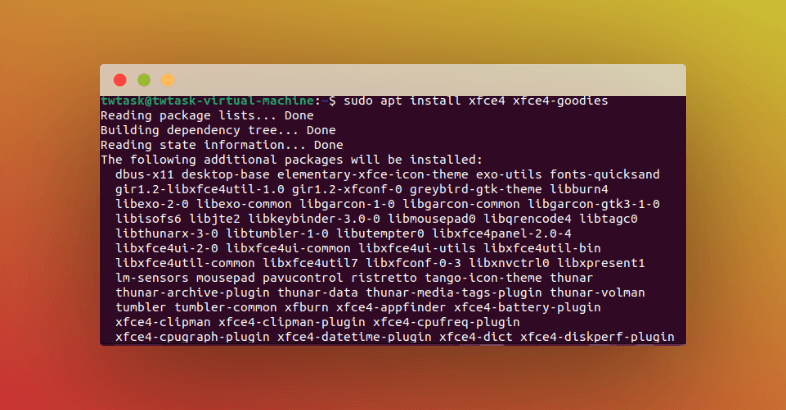
Install Xfce and the xfce4-goodies package to get further desktop environment improvements.
Once the prior installation is complete, install the TightVNC server next.
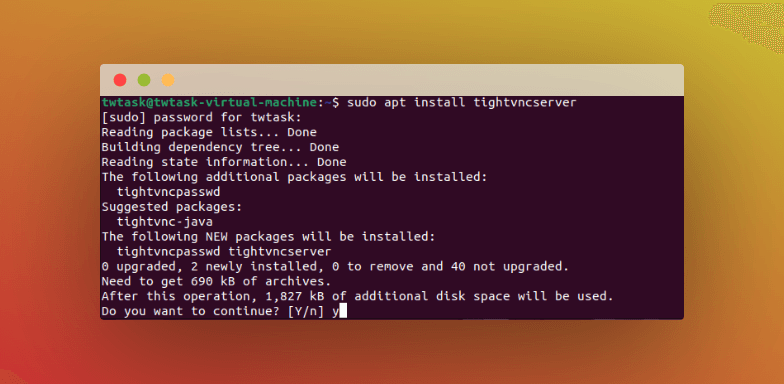
A prompt asking if you want to proceed will appear. In this case, enter y and continue, as seen in the screenshot.
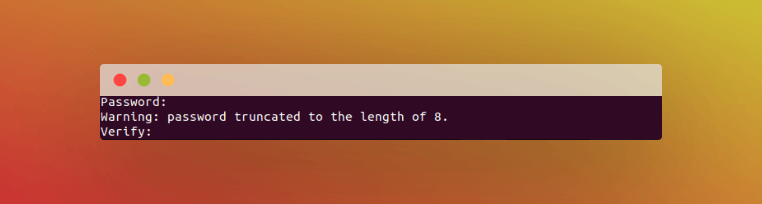
Use the vncserver command to start the VNC server instance and set a password for VNC access.
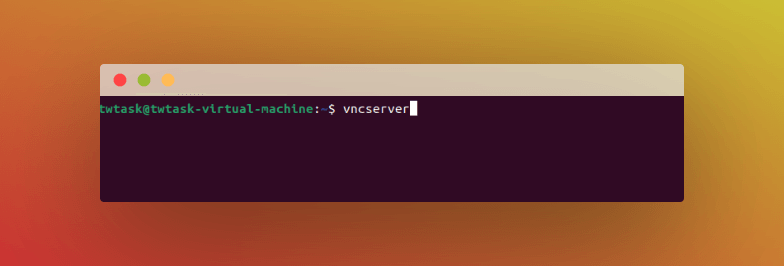
Remember that a password should include six to eight characters. In case the password has less than six characters, a 'short password' alert will show up, and if it exceeds eight characters, it will be shortened.
Let me demonstrate this for you:

Now, let’s set the password between 6 to 8 characters.

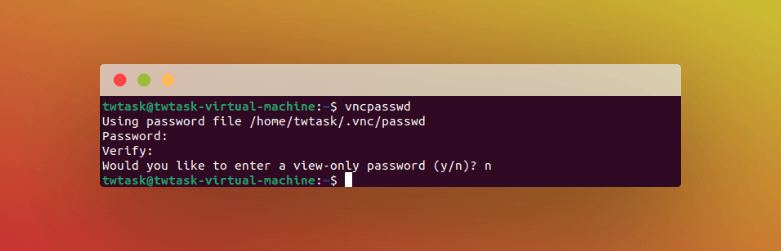
You can create a password that is view-only after the password has been validated. The VNC instance cannot be controlled with a mouse or keyboard by users who log in with the view-only password as a view-only password is similar to a unique key that permits someone to access a distant computer's contents but restricts them from taking any further action.
Note: The process creates the necessary default configuration files and server connection information. It concurrently launches a default server instance on port 5901, which VNC has designated as a display port and is known as :1
Use the vncpasswd command to add a view-only password or change the password once it has been set up.
Let's proceed with the configuration to launch Xfce and enable graphical access to the server.
Step 2: Configuring the VNC server for Xfce Desktop Environment:
The VNC server needs precise starting instructions in order to work as best it can, especially in order to connect to the graphical desktop environment.
A configuration file called xstartup contains the instructions for the actions that the VNC server performs during startup. This file is located in your .vnc folder within your home directory. While the vncserver command generates the default startup script, you will write your version to launch the default Xfce desktop and environment.
Use the following command to halt the presently running VNC server instance running on port 5901 before making any changes to the VNC server configuration:

Make a backup copy of the xstartup file before modifying it.
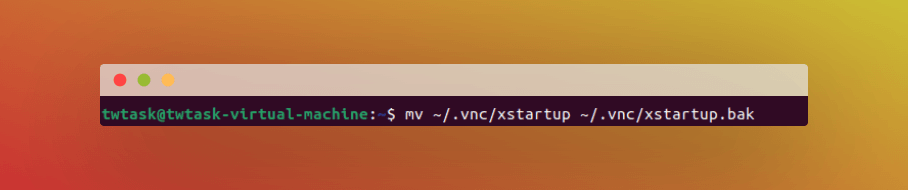
With the help of the text editor nano, create a new xstartup file.

Add the following lines to the file after that:
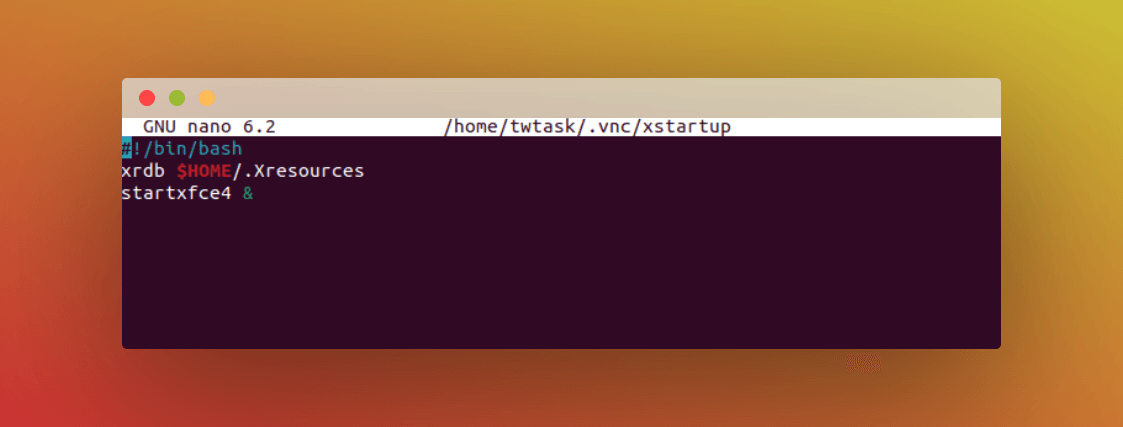
The first line of executable plain-text files serves as a shebang on Unix-like systems. This shebang serves as a guide and tells the system which interpreter to use when the file executes.
The initial command xrdb $HOME/.Xresources in the file tells the VNC server installed GUI framework to read the .Xresources file belonging to the server user. Users can alter the graphical desktop's font rendering, cursor themes, and terminal colors by accessing this file. The server must launch Xfce according to the second instruction. Every time the VNC server begins or stops, these commands run automatically.
After adding these lines, save and exit the document.
To ensure that the VNC server can properly use the new startup file, make sure it is executable. Run chmod +x filename and substitute the real name of your startup file for ‘filename.’

After that, restart the VNC server.

Observe that this program now includes the -localhost option, which connects the VNC server to the loopback interface on your server.
Establishing an SSH tunnel between your local computer and the server is the next step. This basically causes VNC to believe that the connection coming from your local computer is coming from the server. By restricting access to those who already possess SSH access to your server, this technique enhances VNC's security even more.
After everything is configured, you may use your local computer to establish a connection with the VNC server.
Step 3: Establishing a Secure VNC Desktop Connection:
Secure protocols may not be present while connecting to the server using VNC. We'll set up an SSH tunnel to improve security. Instructing the VNC client to use this tunnel rather than trying a direct connection provides a safer connection.
Enter the following command into the terminal to create an SSH connection:
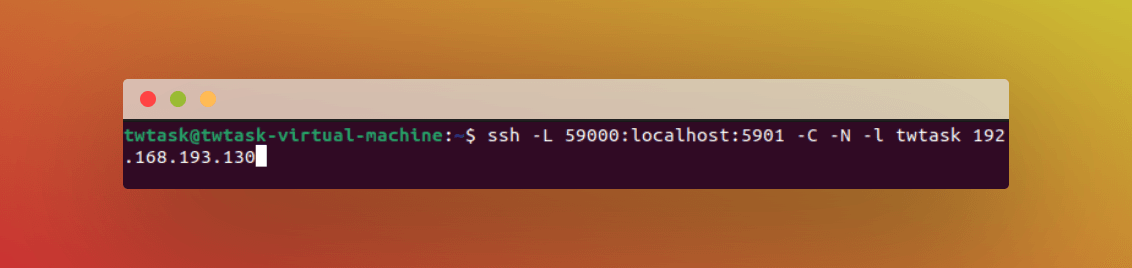
The following describes the options that are utilized in this SSH command:
-
L 59000:localhost:5901: Indicates that the host and port on the destination server, which is localhost:5901 (i.e., port 5901 on the destination server, identified as 192.168.193.130), should receive traffic from the machine establishing the connection. As long as another service is not using it already, you can use whatever local port you like.
-
C: Allows compression to boost performance and use fewer resources.
-
N: This indicates that no remote commands should run; it's helpful when port forwarding is the only thing being done.
-
l twtask: Indicates the user to log in when the connection is made (twtask in this example).
192.168.193.130: Replace this with your server's real IP address. You can get your IP address by using the command ‘ifconfig.’
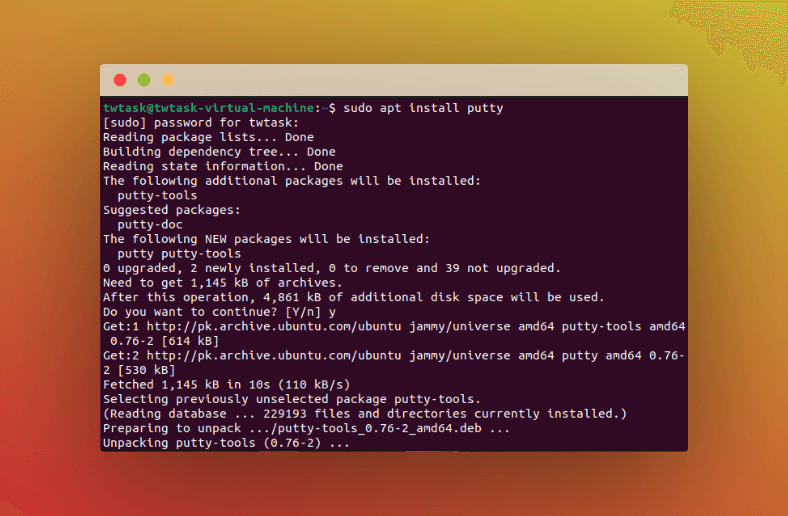
In order to establish a connection with the server, install PuTTY.
Follow the following steps to install:
Step 1: Run the command sudo apt install Putty to install PuTTY.
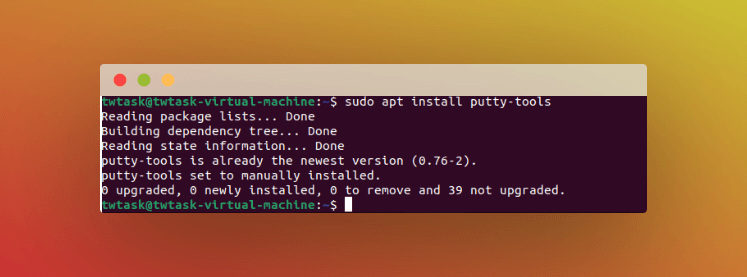
Step 2: Then install tools with this command:
The installation has been completed, so type the command "putty" into the terminal to launch PuTTY.

Enter the port number, the name of the saved session, and your hostname or IP address when you navigate to the sessions.
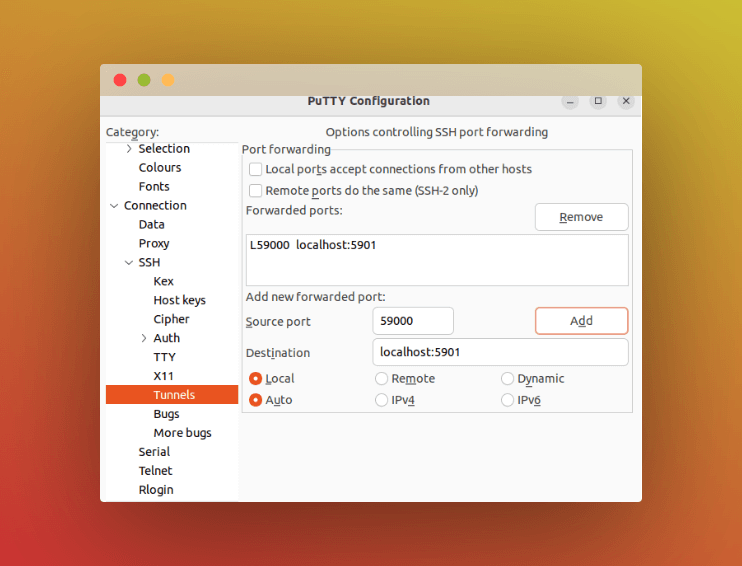
Subsequently, choose the Connection section located on the left side of the terminal and proceed to expand the SSH tunnel and SSH port forwarding screen again. Select "Tunnels" by clicking.
In order to configure SSH port forwarding, enter localhost:5901 as the destination and 59000 as the source port.
Step 4: Setting Up a Systemd Service for VNC Server Ubuntu:
The ability to easily administer the VNC server is granted by allowing it to function as a systemd service.
This involves adjusting the server's start, stop, restart, and end times to suit your needs. You may also verify the server's status every time it boots up by using system management commands.
To choose the preferred VNC display port for service administration, we will first create a unit file.

You'll see the @ symbol at the end of the file name, which indicates that an argument can be included while configuring the service.
Then, append the specified lines to the unit file. To customize change, the WorkingDirectory, User, Group, and username within the PIDFILE value:
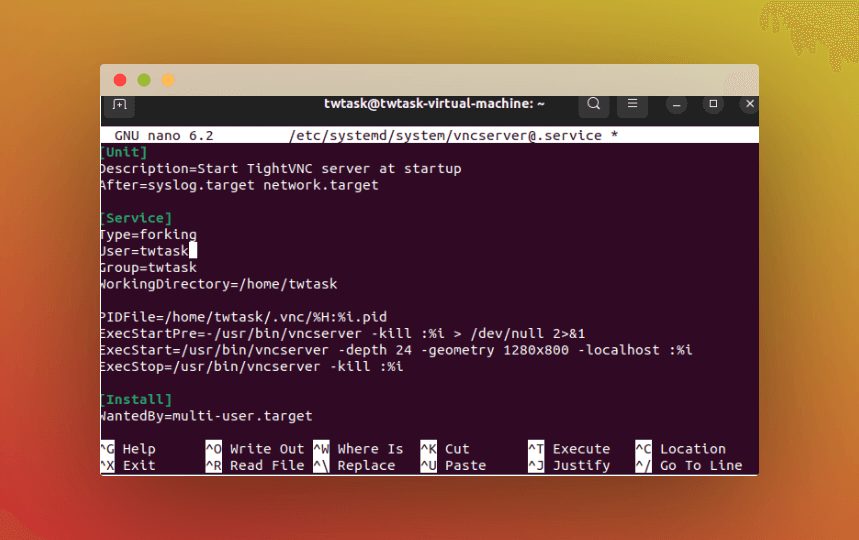
The ExecStartPre command is intended to terminate an open VNC session. Then, VNC is launched using the ExecStart command, with a resolution of 1280x800 pixels and a color depth of 24. These startup parameters can be changed to meet your needs. It's interesting to note that when using the ExecStart command, the -localhost option is always present.
Now, include the newly created unit file in your system:

Activate the unit file:

After the @ symbol, the number "1" indicates the display number where the service will be shown; in this example, it indicates the default: 1.
If the VNC server is still up and running, stop its instance:

After that, launch it just like any other systemd service:

You can use this command to confirm that it began:
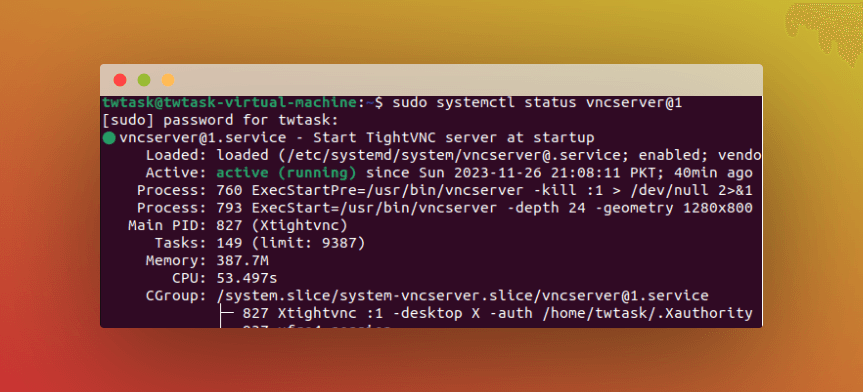
Now that your server is set up to boot up every time, you may manage your VNC server with systemctl commands, just like you would with any other systemd service.
However, there will be no significant modifications as seen from the client's perspective.
Restarting your SSH tunnel will restore the connection.
The Revolutionary Effect of VNC Servers on Collaborative Computing and Remote Management:
Setting up a VNC server for the first time might be a little complicated, especially if you're connecting to a new computer. However, if a stable connection is established, operating a computer remotely may be exciting and enjoyable.
Expanded system exploration capabilities and more seamless operations are made possible by installing a VNC server onto your server. Improved accessibility with an intuitive interface allows for effective remote operation and adjustment.
It is crucial to understand that there are certain considerations to make when utilizing VNC. One major disadvantage is the potential for excessive bandwidth usage. Lower screen resolutions and the use of greyscale monitors are two possible strategic solutions for this. These actions contribute to the acceleration of data transmission by mitigating the effects of bandwidth use.
Moreover, the VNC server's versatility includes compatibility with a wide range of operating systems, enabling smooth communication between Ubuntu 20.04 servers and other platforms. Because of its interoperability, remote computing has become more versatile and encourages resource sharing and cooperation in a variety of settings.
Setting up a VNC server is a useful tool for navigating the complexities of remote server management since it offers a visual portal to your server's functions. The graphical interface's ease of use makes jobs and setups simpler, which benefits both inexperienced and seasoned users.
To sum up, even if setting up a VNC server might be a little difficult at first, the advantages of easier remote management, improved accessibility, and the ability to collaborate make it a valuable addition to your server architecture. By carefully monitoring bandwidth use and implementing optimization strategies, the VNC server turns into a potent ally in promoting productive and successful remote computing sessions.

.png)