The idea of self-hosting is frequently associated in the app deployment and management community with fearsome setups, confusing command lines, and an ongoing fight against security flaws.
But imagine if managing your application's infrastructure was as easy and natural as using any application in the cloud. Presenting Dokku, hailed as a revolutionary in the field of deployment platforms.
But how does Dokku streamline things, and what is it anyway? Come with us as we explore its fundamentals and learn how it simplifies management and deployment. We will cover Dokku's capabilities and how it revolutionizes the deployment environment, starting with the initial setup and moving on to sophisticated setups.
What is Dokku?

A Platform as a Service (PaaS) solution developed on top of Docker and other open-source components, the Dokku server is generally seen as a game-changer in deployment platforms. Implemented invisibly, the Dokku server uses containerization technology to bundle apps into portable, compact containers, guaranteeing dependability and consistency in various settings.
It provides a straightforward and fast workflow and matches smoothly with contemporary development techniques, simplifying application distribution and administration at its foundation. Moreover, it effortlessly manages the deployment process for the developers, allowing them to concentrate on developing and refining their apps fully.
By providing a simplified and painless experience, Dokku enables you to realize your visions, whether launching a little personal project or overseeing a complicated production environment. When complemented with VPSServer, you can host Dokku instances and deploy applications easily. It ensures high availability and performance for your applications, along with providing flexible server configurations and efficient resource management.
Main Benefits and Characteristics
The main benefits and characteristics of the Dokku server are as follows:
Deployment using Git
The tight connection with Git is one of the most notable aspects of Dokku. Developers can automate the deployment process with a simple push to a Git push repository, doing away with the requirement for manual involvement. permission denied error
Setup with No Initialization
The Dokku server detects programs automatically and configures them depending on the settings you supply, making configuration a breeze. Developers can save a lot of time and make sure everything is consistent across deployments by using this "zero configuration" method.
Wide Applicability
Due to its modular design, the Dokku server can be easily extended using plugins. Developers can extend Dokku with plugins that provide capabilities like surveillance, cached information, and database administration.
Cost-effectiveness
By enabling customers to host it on a local machine or their servers, Dokku provides a more cost-effective alternative to typical PaaS systems, which may be expensive. As a result, you have more say over the deployment environment and can decrease hosting expenses in half.
When Compared to Alternative Deployment Tools
Although there are some similarities between Dokku and other deployment platforms like Heroku and Docker, there are also some distinct benefits that make it stand out:
1. Complete Authority Over Hosting Setup

Heroku: With Heroku's entirely managed system, developers can deploy your projects quickly and easily. The trade-off for this ease is giving up some command over the hosting system. Heroku restricts users to using your default settings and resources, which might not work for your needs.
Dokku: In contrast, Dokku gives you complete command over your web server. When you install apps on your infrastructure, it can tailor the environment to your requirements, whether for performance optimization, security standard conformity, or integration with existing systems.
2. Seamless Combination with Current Setup
Docker: Docker changed the game for application packaging and deployment as a portable and light containerization technology. But Docker's setup and management might be a hassle for those unfamiliar with containerization innovations.
Dokku: Following Docker's footsteps, Dokku simplifies deployment and offers an intuitive user interface. It removes the complexity of container and orchestration administration, enabling users to concentrate on application development instead of infrastructure management, in contrast to Docker.
Dokku also works well with preexisting operating systems), so it's easy to incorporate it into your current processes and settings.
3. Cost-effectiveness
Heroku: You must pay for Heroku's core services and any additional ones you use with each dyno (application container). While Heroku is scalable and convenient, the cost may build up fast, particularly for bigger projects or enterprises with a lot of traffic.
Dokku: Dokku lets you host apps on your infrastructure, making it a more cost-effective option than Heroku. You can drastically cut hosting expenses without sacrificing speed or scalability by using existing hardware or choosing economical cloud hosting services.
Getting Started With Dokku: How to Install the Latest Stable Version?
Make sure your computer has these minimum requirements before you start using Dokku:
System Requirements
The following server architectures are available:
-
ARMV8 (arm64)
-
Ubuntu 20.04/22.04
-
Debian 10+ x64
-
AMD64 (x86_64)
It is advised to have to prevent memory difficulties during builds or runtime:
-
At least 1 GB of system memory
Guidelines for Domain Configuration
If you want your apps to be easy to access, you should connect your server to a database service with either a single domain name. Take into account the following choices:
-
A record with a wildcard domain (*.domain.tld) that grants access to applications through $APP.domain.tld.
-
Use domain.tld:$RANDOM_PORT to access apps on a single domain (also known as a CNAME record or domain.tld A)
Detailed information can be found on the domain name in the DNS and domain documentation.
Installing the Latest Secure Version of Dokku
Follow the below-given steps to install the recent stable version:
-
How to Install
With apt-get on Debian systems, these shell commands should work:
# To set up Dokku on Debian systems, you can utilize the apt-get package manager for installation
wget -NP . https://dokku.com/install/v0.33.6/bootstrap.sh
sudo DOKKU_TAG=v0.33.6 bash bootstrap.sh
Installing usually takes around 5-10 minutes, however, this might vary based on the speed of your internet connection.
-
Configuring Vhost and SSH Key
Launch the following command to set up your global domain and establish an SSH key after installation:
#Your SSH key is already stored in the current user's ~/.ssh/authorized_keys file. You can add it to Dokky by running the following command:
cat ~/.ssh/authorized_keys | dokku ssh-keys:add admin
#You can associate a domain with your Dokku server using the domains:set-global command. For example, you can set a domain for example.com like:
#dokku domains:set-global example.com
Alternatively, if you prefer to use an IP address, you can set it directly with Dokku:
#dokku domains:set-global 10.0.0.2
#Additionally, you can use sslip.io to gain subdomain support for your server. Here's how you can set it up:
#By appending .sslip.io to your IP address, you can access your server with a subdomain. For example:
dokku domains:set-global 10.0.0.2.sslip.io
For further information, see the documentation on user administration and domains.
-
Deploying Your First Application
The initial application deployment to the installation of Dokku is now ready to go.
A Thorough Guide on Deploying Your First Application on the Dokku Server

By integrating Git-based processes with containerization technologies, Dokku streamlines the application deployment process. Starting with environment setup and ending with post-deployment application management, this detailed tutorial will cover it all.
Step 1: Environment Configuration
You must verify that the setup is appropriately set up before deploying your application to Dokku. Preparing a server to add Dokku and setting up any required dependencies, including Docker and Git, are common steps to deploy applications.
# from your local machine
git clone https://github.com/heroku/ruby-getting-started
Our services at VPSServer make starting Dokku easy by providing pre-configured images or one-click installations. You can also follow the steps in the official Dokku guide to manually add Dokku to your server.
Step 2: Setup of Dokku
After you've prepared your environment, installing Dokku is the following step. This normally only takes a few clicks if you're using an installation that only requires one click.
To install Dokku manually, you must use SSH to access your server and execute the installation script with Dokku.
# on the Dokku host
dokku apps:create ruby-getting-started
Domain name and key configuration are among the first app settings to be asked for during installation. To finish and configure the installation properly, follow the on-screen instructions and input all required information.
Step 3: Setting Up Your Program
Ensure your application is set up to operate with the Dokku host before deploying it.
To accomplish this, you may need to configure environment variables, install any necessary services or requirements (such as databases or cache servers), and check that your program can be deployed using Dokku.
Step 4: Creating SSH Keys
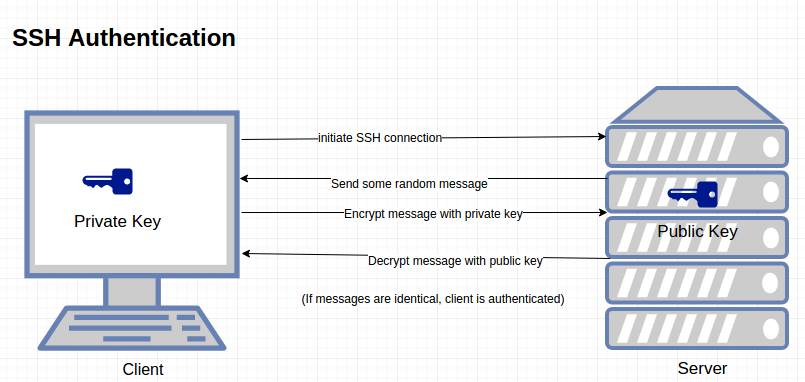
Setting up SSH keys for authentication is necessary before you can push your code to Dokku. If you haven't done this, generate an SSH key pair on your local machine or workstation. Then, add the public key to your Dokku server.
Adding your SSH key to the Dokku host is as simple as using the command line interface (CLI) or going into your .ssh/authorized_keys file and inserting the public key.
Step 5: Making Your Code Visible
Once your environment and SSH keys are established, you are prepared to upload the source code to the Dokku host. First, use the git local add command to add Dokku as a remote Git source. Ensure you enter your Dokku server's IP address and the app title you are developing.
The git push authority, with the branch you wish to deploy specified, allows you to distribute and deploy your code to the Dokku host once you've installed it as a remote.
Based on the variables you've supplied, such as if a Dockerfile or Procfile is present, Dokku will automatically discover and deploy a Docker container for your application.
Step 6: Keep Your Deployment Under Control
Once your app is launched, you can handle your app's settings using Dokku's online dashboard or command-line interface (CLI). Application management is made easy using the Dokku command line interface (CLI). You can inspect logs, configure multiple domains together, modify environment variables, and scale the number of containers.
Monitoring resource consumption, establishing SSL certificates, and managing plugins are just a few of the usual administrative chores that can be accomplished using the online dashboard.
Step 7: Continuous Integration and Deployment
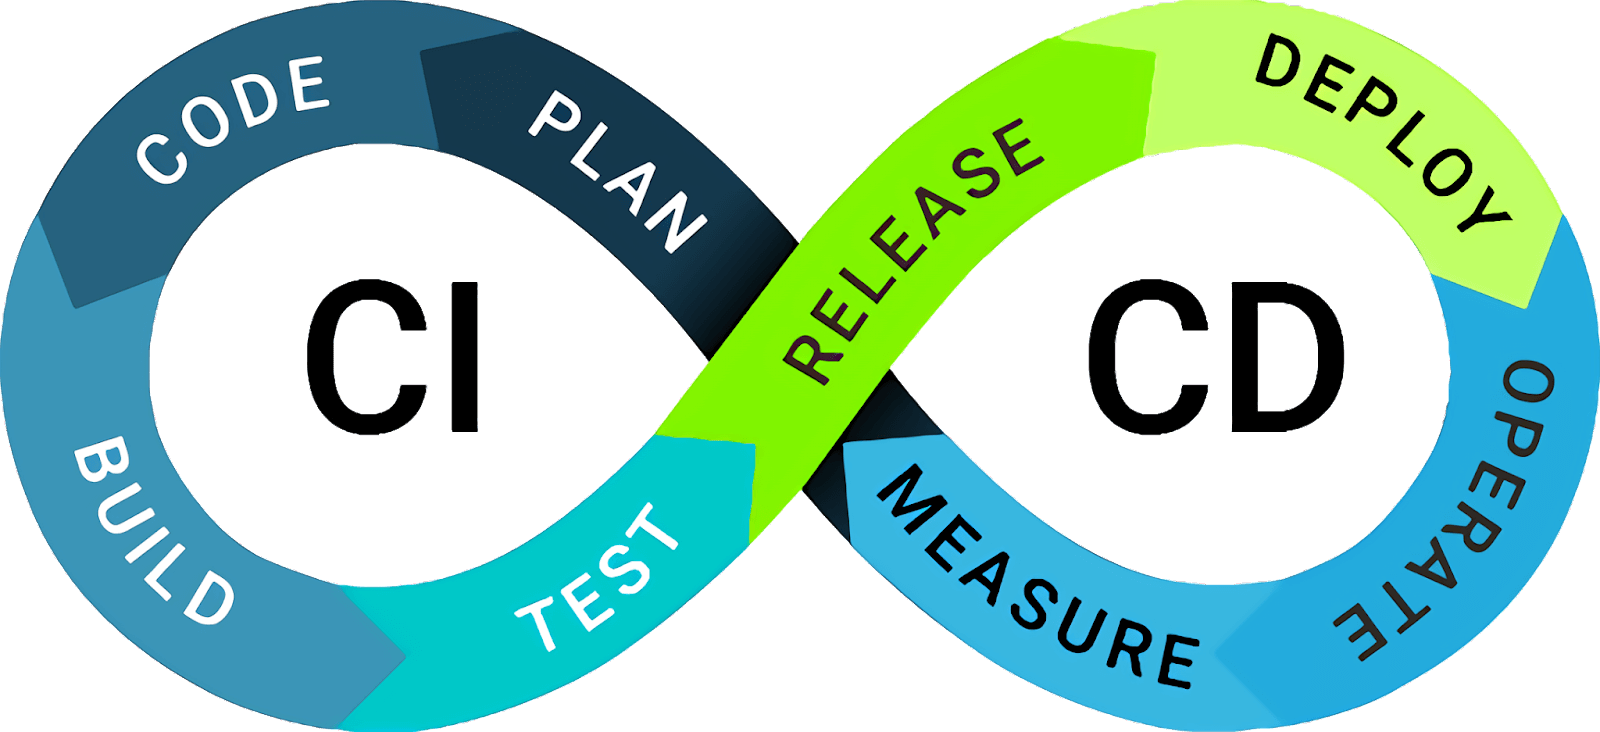
You can incorporate Dokku into your CI/CD pipeline for more sophisticated deployment methods. Ensuring your app is constantly up-to-date with the newest improvements is made easy with this automated deployment method plugin.
Whenever you commit changes to your Git repository, continuous integration and delivery pipelines can automatically build and test your application.
If the tests pass, the changes can be deployed to Dokku. This aids in making the development process more efficient and less prone to mistakes or problems making it into production.
Recommended Procedures for Deploying Dokku
The recommended procedures for deploying Dokku are:
Setup of the Application
For your application to be deployed successfully on Dokku, it must be configured correctly. Ensure you've set up all the necessary environment variables, such as API keys and database connection strings.
Also, be sure to provide all the libraries and dependencies that your program needs to function properly!
To define your application's starting instructions writing objects, and processes, the Procfile is an essential file. For Dokku to handle your program correctly, you must precisely provide the command required to launch it.
To keep track of your application's settings and code, version control is essential. Maintain a history of deployments, interact with team members, and monitor changes with a version control system like Git.
When working with several development environments, it's important to use version control so you can simply undo changes if problems occur during deployment.
Continual Revision
Your Dokku deployment process may significantly improve by incorporating continuous integration (CI) approaches. Integrity pipelines may be set up to automate creating, testing, and deployment processes.
Continuous Integration (CI) allows you to generate Docker images, automate tests to check code quality and deploy to Dokku in a controlled and predictable way. This allows for more rapid rollouts of updated features and bug fixes by decreasing the likelihood of deployment mistakes and inconsistencies.
Application logs can be captured and analyzed with tools like ELK stack or Fluentd, allowing faster problem diagnosis and troubleshooting. You can avoid problems before they affect users by keeping tabs on and recording activity in your web applications themselves.
Security
When releasing apps on Dokku, security must be your first concern. Applying the most recent security patches and upgrades to your Dokku installation and server setup can reduce risks.
Use tools like Docker Security Scanning or vulnerability detectors to find and fix security flaws in your Docker images and dependencies. It is recommended to implement access restrictions and authentication techniques to protect sensitive resources and ensure that only authorized users control and deploy apps on Dokku.
Experience the Ease of Dokku Deployment and Management with VPSServer's Hosting Solutions

Explore the hosting options offered by VPSServer to elevate your Dokku deployment. With flexible infrastructure choices and powerful capabilities, the VPSServer is designed to make deploying and operating Dokku applications easy.
Without worrying about infrastructure limits, you can launch, scale, and manage your apps with our trustworthy hosting options. Dokku is a great fit for any size business, and VPSServer gives you the power and flexibility you need.
Gain the knowledge and confidence to fully use Dokku's capabilities by following extensive guidance. You can simplify your deployment procedures, gain productivity, and concentrate on creating creative apps that propel your organization ahead with VPSServer's hosting options.
Frequently Asked Questions
How can I restart apps in Dokku?
The following command: dokku restart app will restart the app in Dokku. Please restart your application, where "APP_NAME" is the name of your program.
What is the process to create a public key?
Using the ssh-keygen command in the terminal is one way to generate a custom domain and a public key. To generate either a single empty domain name or a fresh set of SSH keys, just run ssh-keygen and follow the on-screen instructions.
How do I add a public key to SSH?
The ssh-copy-id command, which takes the server's username and IP address as arguments, is how you add a public key to the single server over SSH. The command "ssh-copy-id user@server_ip" is being used as an example.
Where can I find my SSH public key?
The.ssh directory in your home directory (~/.ssh) is where you can find your SSH public key. Search for the id_rsa.pub file that holds your public domain name key.
How do I connect to SSH using a key?
The correct syntax for establishing a private key-based SSH connection is SSH, which requires the user's credentials, the server's IP address, and the location of the private key. Another example is a command like ssh -i /path/to/private_key user@server_ip.

Rimsha Ashraf is a technical content writer and software engineer (available on LinkedIn). She has written 1000+ articles and blogs and has completed over 200 projects on various freelancing platforms. She specializes in topics such as cybersecurity, cloud computing, machine learning, artificial intelligence, blockchain, and cryptocurrency.