


Installing Drupal on Ubuntu 16 VPS Server
Overview
In this Drupal tutorial i will help you how you can configure Drupal on an Ubuntu 16 VPS Server from VPSServer.com. It is a free and a very populair PHP-based CMS worldwide. It is used for all kind of websites.
Prerequisites
This article assumes that you have:
1. An Ubuntu VPS server ready to be configured and installed with Drupal. If you don't have one, you can order from vpsserver.com[1].
2. Have basic knowledge with Linux, knows how to handle a command line interface.
3. You have an ssh client ready to be used (bitvise or putty).
Updating Ubuntu
Before we can install Drupal we must first update our Ubuntu packages to the latest by running the below commands:
sudo apt-get update
Now let us upgrade all existing installed packages. Lets do this by:
sudo apt-get upgrade
Installing LAMP
Before we can serve Drupal to our clients or website visitors we must first install the necessary packages that will enable your server to serve web pages on the internet.
We will need to install a LAMP (Linux, Apache, Mysql, Php) server on our Ubuntu 16. To do this we should go back to another tutorial on installing LAMP server on Ubuntu[2].
The tutorial is for an Ubuntu 14 server but basically the process for Ubuntu 16 is the same.
Once you have installed the necessary packages and you have tested your LAMP server we can now go on installing the PHP-modules.
To install our php modules we run:
apt-get install php5 php5-mysql php5-gd php5-curl libssh2-php
Once installation is finished we can now install Drupal on our new LAMP server.
Installing Drupal
To install Drupal we need to download the latest Drupal package from their website. Go to https://www.drupal.org/download[3] and download the latest package.
The latest version used in this guide is version 8.2.1 so we will download that version using wget.
wget https://ftp.drupal.org/files/projects/drupal-8.2.1.zip
Next stap, let us unpack our files into the document root (/var/www/html) directory of your server.
unzip drupal*.zip
cp -rf drupal*/* /var/www/html/
Afterwards let us change the directory permissions so we can access the folder without problems.
chown www-data:www-data -R /var/www/html/
chmod -R 755 /var/www/html/
Configuring Mysql/MariaDB for Drupal use
Our Drupal installation will not be able to work yet since we will need a database for all the values Drupal will store later on such as user credentials and many more.
In this guide we will have to create a database and add a database user. These values will be later used by Drupal during the installation process.
Let us login to the mysql as administrator user by:
mysql -u root -p
Enter your MySQL root password to login to mysql cli admin area.
Afterwards we will create a Drupal database. We can do this inside the mysql admin interface using the command:
create database drupal;
grant all privileges on drupal.* to drupaluser@localhost identified by 'your_password';
flush privileges;
Once all is done we can now exit mysql by typing:
exit;
Configuring Apache for Drupal use
Let us create a new Apache virtual host configuration named drupal.conf. In this file we will fill all information regarding our drupal virtual host configuration. To start with we will do:
sudo a2enmod rewrite
Next, create a file named drupal.conf:
touch /etc/apache2/sites-available/drupal.conf
Afterwards we will need to link this new configuration file in another folder.
ln -s /etc/apache2/sites-available/drupal.conf /etc/apache2/sites-enabled/drupal.conf
Now open and edit the file drupal.conf:
nano /etc/apache2/sites-available/drupal.conf
Inside we will put the configuration values for our new virtual host:
<VirtualHost *:80>
ServerAdmin admin@yourdomain.com
DocumentRoot /var/www/html/
ServerName your-domain.com
ServerAlias www.your-domain.com
<Directory /var/www/html/>
Options FollowSymLinks
AllowOverride All
Order allow,deny
allow from all
</Directory>
ErrorLog /var/log/apache2/your-domain.com-error_log
CustomLog /var/log/apache2/your-domain.com-access_log common
</VirtualHost>
Then restart Apache to reflect our changes.
systemctl restart apache2.service
Configuring Drupal
To access Drupal, go to your web browser and enter your domain or ip address like:
http://{yourdomain_or_ip_address}
an example would be:
http://mydrupalwebsite.com
http://123.23.23.14
Selecting the right profile
You will see an installation profile page like below:
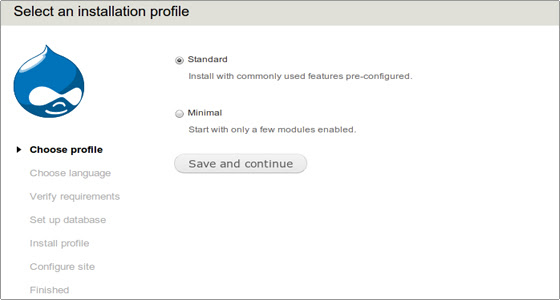
To determine which profile you can use please read more details on the installation profiles can be read at the Drupal Website[4].
Entering Correct DB values
Next, enter the database values you earlier configured in the mysql administrator cli. make sure you select Mysql/MariaDB for the database.

Click on "Save & Continue to go to the next step.
Configure Website
Now, you set up some basic information for your website.
Please enter a fill every fields necessary to properly configure your website such as your website name, email address and your username & password credentials.

Click on 'Save & Continue" button to complete your installation.
Once done, you can now visit your website:

That is a long tutorial but worth the time reading, on our future article we will show you how you can further secure Drupal and other websites and applications.
Thank you.
[1]: https://www.vpsserver.com/plans/
[2]: https://www.vpsserver.com/community/tutorials/34/install-lamp-linux-apache-mysql-server-and-php-on-an-ubuntu-14-04-64bit-vps-server/
[3]: https://www.drupal.org/download
[4]: https://www.drupal.org/docs/7/installing-drupal-7/built-in-installation-profiles-drupal-7
Related Tutorials
Installing ServerPilot and Creating an App on Ubuntu 14.04 LTS 64bitInstall Percona Server 5.7 MySQL on Ubuntu, CentOS or Debian
How to install ISPConfig panel on a VPS - Alternative of cPanel - free cPanel
Installing and Securing phpMyAdmin on Ubuntu 16.04 server
Installing NodeJS on an Ubuntu 16.04 VPS Server