Imagine trying to find every item on your extensive shopping list at this big, chaotic supermarket. It sounds like an exhausting task, doesn't it? Sure, it does.
RabbitMQ serves as a highly efficient guide within the digital realm, adeptly ensuring data's seamless and precise journey from its origin to destination. Its robustness combined with user-friendliness has garnered a vast user base. Imagine having a knowledgeable personal assistant, fluent in various communication protocols, capable of effortlessly bridging cloud, on-premises, and local environments.
Today, millions of people are using RabbitMQ because of its robustness and ease of use. It's like having a personal shopping assistant who knows everything and can communicate in multiple languages (from cloud to on-premises to local machines). Whether it's managing the flow of critical financial transactions, orchestrating microservices, or simply ensuring that your application's components communicate seamlessly, RabbitMQ does it all with ease.
Let's explore how RabbitMQ can turn your messaging challenges into a walk in the park, or better yet, a successful shopping spree in the world's busiest digital supermarket.
What is RabbitMQ?
Once again, imagine strolling through our bustling digital supermarket, where RabbitMQ is the agile, unseen force zipping messages across aisles with the precision of a top-tier shopping assistant. It ensures that every grocery item or “Communication” reaches its destination in record time, keeping the store's operations smooth and customers happy.
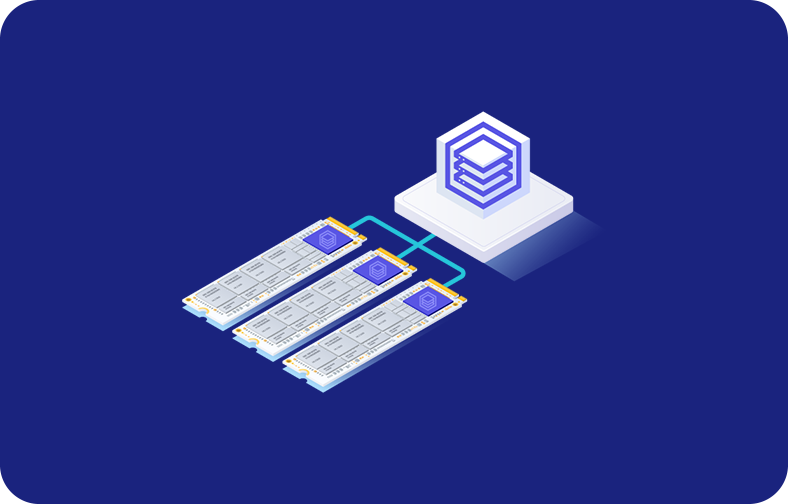
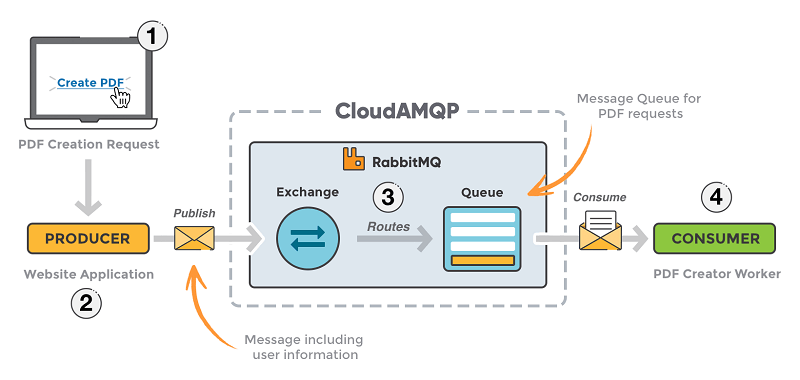
In simple words, RabbitMQ is a free message-routing software. It efficiently transfers messages across various parts of an application. As a middleman, it collects messages from producers (which generate messages) and delivers them to consumers (which receive messages).
This setup is crucial for apps or systems spread out over different locations or parts, as it supports asynchronous (not in real-time) communication, helping them to scale up, stay reliable, and handle failures well.

RabbitMQ works with many messaging queues and mainly uses the AMQP (Advanced Message Queuing Protocol). It fits into different setups like on-premises, cloud, or hybrid environments.
For those interested in integrating RabbitMQ into their architecture, make sure the performance and reliability of your underlying infrastructure are top-notch. This is where VPSServer comes into play. Our VPS hosting provides the perfect environment for your RabbitMQ deployment, offering the speed, control, and flexibility needed to connect and manage your messaging needs efficiently.
Why RabbitMQ?
RabbitMQ broker is not just a standard tool. It's like having a helper who knows many languages, can do lots of things, and never misses a beat, making sure your messages get through easily. Let's see why RabbitMQ is a top choice among many messaging options:
Interoperable
RabbitMQ excels in its ability to work seamlessly with various systems. It is a key feature in today’s heterogeneous computing environments. This software supports various open standard protocols, including AMQP 1.0 and MQTT 5. This wide range of supported protocols ensures that RabbitMQ can seamlessly integrate into any system architecture. It doesn’t matter which technologies or programming languages are being used.
The availability of numerous client libraries facilitates developers to interact with RabbitMQ using their preferred programming languages, thereby eliminating the risk of vendor lock-in and enhancing the system's adaptability to future technology shifts.
Flexible
Flexibility is a core attribute of RabbitMQ. It empowers developers with a comprehensive set of options for message delivery customization. RabbitMQ's routing capabilities allow for sophisticated message distribution patterns. It ranges from simple point-to-point messaging to complex routing scenarios involving multiple producers and consumers.
Features such as message filtering, streaming, and federation provide the necessary tools to tailor the messaging architecture to the server and client applications' specific requirements. This flexibility improves message delivery efficiency and supports the system's scalability and evolution over time.
Reliable
Reliability in message delivery is paramount. RabbitMQ stands out with its message acknowledgment and replication features. It prevents messages from getting lost by using acknowledgments. This means a message isn't removed from the queue until it's confirmed to have been received and processed by the consumer.
Furthermore, RabbitMQ can replicate messages across multiple nodes in a cluster. It enhances the messaging infrastructure's fault tolerance and high availability. These features ensure that RabbitMQ can reliably handle critical application data across multiple environments.
RabbitMQ Step-by-Step Coding Instructions
The RabbitMQ tutorials are tailored for a broad audience. Whether you’re a beginner or have in-depth experience in messaging systems, this is just the right tutorial for you. Below is a summary of what the tutorials offer.
Ruby Sample Code
To effectively use RabbitMQ with Ruby, follow these simplified and detailed step-by-step instructions. This tutorial covers publishing and consuming messages using RabbitMQ and the Bunny library in Ruby.
Setting Up Your Environment
1. Install Bunny Library: First, ensure you have the Bunny client library installed. Bunny is an asynchronous Ruby client for RabbitMQ. Install it by running:
gem install bunny
2. RabbitMQ Instance: You need an active RabbitMQ instance. For testing purposes, you can set up a free instance on CloudAMQP by following their setup instructions.
Publishing Messages with RabbitMQ
Code Overview - Publisher (example_publisher.rb):
require "rubygems"
require "bunny"
require "json"
conn = Bunny.new ENV['CLOUDAMQP_URL']
conn.start
ch = conn.create_channel
q = ch.queue("examplequeue", :durable => true)
x = ch.direct("example.exchange", :durable => true)
q.bind(x, :routing_key => "process")
information_message = "{\"email\": \"example@mail.com\",\"name\": \"name\",\"size\": \"size\"}"
x.publish(information_message, :timestamp => Time.now.to_i, :routing_key => "process")
sleep 1.0
conn.close
Step-by-Step Explanation - Publisher:
-
Set Up a Connection: Establish a connection to your RabbitMQ instance using the Bunny library. ENV['CLOUDAMQP_URL'] should be replaced with your actual CloudAMQP URL found in your instance details.
-
Create a Channel: Channels are virtual connections inside a TCP connection. Create one to send commands to the broker.
-
Declare a Queue: Define a queue named examplequeue. The ‘:durable’ option ensures the queue will survive broker restarts.
-
Bind the Queue to an Exchange: Use a direct exchange named example.exchange. Messages sent to this exchange are routed to queues based on a routing key.
-
Publish a Message: Send an information message to the exchange with a routing key of process.
-
Close the Connection: Ensures that the message is sent before closing the connection.
Consuming Messages with RabbitMQ
Code Overview - Consumer (example_consumer.rb):
require "rubygems"
require "bunny"
require "json"
conn = Bunny.new ENV['CLOUDAMQP_URL']
conn.start
ch = conn.create_channel
q = ch.queue("examplequeue", :durable => true)
def pdf_processing(json_information_message)
 puts "Handling pdf processing for #{json_information_message['email']}"
 sleep 5.0
 puts "pdf processing done"
end
q.subscribe(:block => true) do |delivery_info, properties, payload|
 json_information_message = JSON.parse(payload)
 pdf_processing(json_information_message)
end
Step-by-Step Explanation - Consumer:
-
Set Up a Connection & Channel: Similar to the publisher, establish a connection and create a channel.
-
Declare the Same Queue: Ensure you declare the same queue (examplequeue) as the publisher to receive messages from it.
-
PDF Processing Method: A placeholder method to simulate processing of received messages.
-
Set Up the Consumer to Subscribe: Use q.subscribe to listen for messages from the queue. Each received message is parsed from JSON and passed to the pdf_processing method for handling.
Node.js Sample Code
To set up and use RabbitMQ with Node.js, follow these simplified steps based on the provided content. This guide uses the amqplib package to interact with RabbitMQ for both publishing and consuming messages.
Setting Up Your Environment
-
Install amqplib: Add amqplib to your project as a dependency. You can do this by running:
npm install amqplib
Establishing Connection Now
var amqp = require('amqplib/callback_api');
var amqpConn = null;
function start() {
 amqp.connect(process.env.CLOUDAMQP_URL + "?heartbeat=60", function(err, conn) {
 if (err) {
 console.error("[AMQP]", err.message);
 return setTimeout(start, 1000);
 }
 conn.on("error", function(err) {
 if (err.message !== "Connection closing") {
 console.error("[AMQP] conn error", err.message);
 }
 });
 conn.on("close", function() {
 console.error("[AMQP] reconnecting");
 return setTimeout(start, 1000);
 });
 console.log("[AMQP] connected");
 amqpConn = conn;
 whenConnected();
 });
}
Publisher Setup
var pubChannel = null;
var offlinePubQueue = [];
function startPublisher() {
 amqpConn.createConfirmChannel(function(err, ch) {
 if (err) return console.error("[AMQP] channel error", err.message);
 ch.on("close", function() {
 console.log("[AMQP] channel closed");
 });
 pubChannel = ch;
 while (offlinePubQueue.length) {
 var [exchange, routingKey, content] = offlinePubQueue.shift();
 publish(exchange, routingKey, content);
 }
 });
}
function publish(exchange, routingKey, content) {
 try {
 pubChannel.publish(exchange, routingKey, new Buffer(content), { persistent: true },
 function(err, ok) {
 if (err) {
 console.error("[AMQP] publish", err);
 offlinePubQueue.push([exchange, routingKey, content]);
 pubChannel.connection.close();
 }
 });
 } catch (e) {
 console.error("[AMQP] publish", e.message);
 offlinePubQueue.push([exchange, routingKey, content]);
 }
}
Explanation:
-
Opens a channel in confirmation mode, ensuring messages are acknowledged by the server.
-
Messages that can't be sent immediately are stored in offlinePubQueue and retried later.
-
publish function sends messages to a specified exchange with a routing key.
Consumer Setup
function startWorker() {
 amqpConn.createChannel(function(err, ch) {
 if (err) return console.error("[AMQP] channel error", err.message);
 ch.prefetch(10);
 ch.assertQueue("jobs", { durable: true }, function(err, _ok) {
 if (err) return console.error("[AMQP] assertQueue", err.message);
 ch.consume("jobs", processMsg, { noAck: false });
 console.log("Worker is started");
 });
 });
}
function processMsg(msg) {
 work(msg, function(ok) {
 if (ok) ch.ack(msg);
 else ch.reject(msg, true);
 });
}
function work(msg, cb) {
 console.log("PDF processing of ", msg.content.toString());
 cb(true);
}
Explanation:
-
Creates a channel and asserts a queue exists for consuming messages.
-
ch.consume sets up a consumer with a callback (processMsg) invoked for each received message.
-
processMsg processes each message and acknowledges it upon successful processing.
Putting It All Together
To start the publisher web server and consumer, call the start function after defining it. For publishing and receiving messages at intervals:
setInterval(function() {
 publish("", "jobs", new Buffer("work work work"));
}, 1000);
start();
Python Sample Code
To get started with RabbitMQ in Python using Pika, follow these step-by-step instructions. This guide will walk you through setting up a publisher and consumer for message processing with RabbitMQ.
Prerequisites
-
Ensure Python3 is installed on your system.
-
A RabbitMQ instance is required. You can set up a free instance on CloudAMQP for testing purposes.
Installing Pika
-
Add Pika to requirements.txt: Include pika==1.1.0 in your requirements.txt file to specify the Pika version.
-
Install Pika: Run pip install -r requirements.txt to install Pika and any other dependencies listed in your requirements.txt file.
Publisher Setup
Code Overview - Publisher (example_publisher.py):
import pika, os, logging
logging.basicConfig()
url = os.environ.get('CLOUDAMQP_URL', 'amqp://guest:guest@localhost/%2f')
params = pika.URLParameters(url)
params.socket_timeout = 5
connection = pika.BlockingConnection(params)
channel = connection.channel()
channel.queue_declare(queue='pdfprocess')
channel.basic_publish(exchange='', routing_key='pdfprocess', body='User information')
print("[x] Message sent to consumer")
connection.close()
Explanation:
-
Connection Setup: Establish a connection to RabbitMQ using CLOUDAMQP_URL from environment variables or fallback to localhost.
-
Queue Declaration: Declare a queue named pdfprocess.
-
Publishing a Message: Send a message to the pdfprocess queue. The empty string as exchange indicates the default exchange is used.
-
Close Connection: Close the RabbitMQ connection after publishing the message.
Consumer Setup
Code Overview - Consumer (example_consumer.py):
import pika, os, time
def pdf_process_function(msg):
 print("PDF processing")
 print("[x] Received " + str(msg))
 time.sleep(5)
 print("PDF processing finished")
url = os.environ.get('CLOUDAMQP_URL', 'amqp://guest:guest@localhost:5672/%2f')
params = pika.URLParameters(url)
connection = pika.BlockingConnection(params)
channel = connection.channel()
channel.queue_declare(queue='pdfprocess')
def callback(ch, method, properties, body):
 pdf_process_function(body)
channel.basic_consume(queue='pdfprocess', on_message_callback=callback, auto_ack=True)
channel.start_consuming()
connection.close()
Explanation:
-
Worker Function Setup: Define a function pdf_process_function that simulates PDF processing. It sleeps for 5 seconds to mimic the processing time.
-
Connection and Queue Declaration: Similar to the publisher, establish a connection and declare the pdfprocess queue.
-
Message Handling: Define a callback function that processes incoming messages using pdf_process_function.
-
Start Consuming: Begin consuming messages from the pdfprocess queue. The auto_ack=True parameter automatically acknowledges messages upon receipt.
The Management Interface
The RabbitMQ Management plugin and interface is a powerful and user-friendly tool. It makes overseeing and controlling your RabbitMQ server easier by using a web browser. Activating a certain plugin grants you browser-based access to numerous features, streamlining server management.
Let’s take a brief look at what the RabbitMQ Management interface offers.
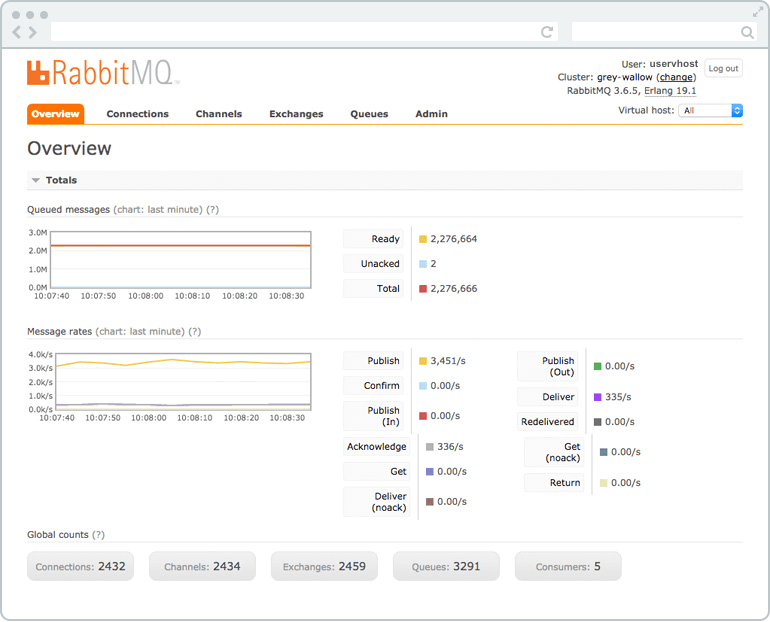
Key Features of RabbitMQ Management Interface
-
Queue Management: Enables you to create, delete, and list queues, helping you organize and control message flow in your system.
-
Connections and Channels: Allows you to manage connections and channels, crucial for linking your applications with the RabbitMQ server.
-
Exchanges Management: Offers tools to create, delete, and view exchanges. Exchanges route messages to one or more queues based on your specified rules.
-
Message Rates Monitoring: This feature allows you to monitor message rates, including publishing, delivery, and acknowledgment rates. It is invaluable for understanding your messaging system's performance and throughput.
-
Manual Message Operations: This feature allows for the manual sending and receiving of messages. It can be particularly useful for testing or debugging purposes.
Accessing RabbitMQ Management Interface
To use the RabbitMQ Management interface, follow these guidelines based on your setup:
For Hosted RabbitMQ Solutions: Visit the details page of your RabbitMQ hosting service, like CloudAMQP. Here, you'll usually find a direct link to access the management interface.
For Local Setup: Simply launch a web browser on your computer and navigate to `http://localhost:15672/`. This address brings you straight to the management interface if RabbitMQ is running locally on your machine.
What About the License?
RabbitMQ offers a versatile licensing setup. It supports both the open-source community for free and businesses seeking extra services and support through paid plans. Here's a little overview:
Free and Open Source
RabbitMQ has two licensing options. It includes the Apache License 2.0 and the Mozilla Public License 2.0. This arrangement offers flexibility for users to select the license according to their project requirements.
-
Flexibility: RabbitMQ can be freely used, changed, and shared under these licenses. This means you can include RabbitMQ in your work without worrying about cost or legal limits.
-
Community Contributions: RabbitMQ encourages community input, whether it's reporting bugs, providing fixes, writing docs, or promoting the tool. Contributing helps support and grow the RabbitMQ community.
Commercial Offerings
-
Enterprise-Grade Support: Broadcom offers enterprise-grade support, which provides 24/7 access to the engineers behind RabbitMQ, ensuring that professional help is available whenever needed.
-
Advanced Features: Commercial offerings include additional management and advanced features tailored for enterprises. Some notable features are warm standby replication and intra-cluster data compression, which are crucial for managing heavy workloads efficiently.
-
Availability: For a comprehensive list of the commercial offerings and to understand the differences between the free, open-source distributions and the commercial versions, interested parties should review the specific resources provided by Broadcom, including the "Ways to run Tanzu RabbitMQ" and the "Free and Open Source RabbitMQ distributions" table.
When to Use the RabbitMQ Server?
RabbitMQ broker excels in managing communication and tasks across different parts of an application. Its use is particularly beneficial in the following main scenarios:
Handling Long-Running Background Tasks
Consider a web server or application where users upload documents, images, or other media files that require processing before they can be used or stored. This processing might involve conversion, resizing, or data extraction, which can be time-consuming. For example, without a message broker like RabbitMQ, you might have to make the user wait for this process to complete.
RabbitMQ allows you to offload these long-running tasks to background processes. When a user uploads a file, the initial request can quickly be acknowledged, and the actual processing is handled asynchronously. This way, the user can continue with other tasks, while RabbitMQ ensures that the upload is processed in the background.
Facilitating Communication Between Microservices
In a microservices architecture, each part of an application is built, set up, and run on its own. For the application to work fully, these parts, or microservices, must communicate. In this setup, RabbitMQ plays a crucial role as a middleman.
Each microservice can operate independently without being blocked by the others if they use RabbitMQ. It allows messages to be queued and delivered to the appropriate service. This decoupling of services helps in scaling, maintaining, and updating different parts of the web application.
Processing Priority Queues
Another advantage is its ability to handle priority queues. It is particularly useful in scenarios where certain tasks must be prioritized over others. i.e., in batch processing jobs that run at regular intervals, urgent tasks might need immediate attention as they don't have the time to wait for the next scheduled run.
With RabbitMQ, these urgent tasks can be placed in a priority queue and processed immediately following a command line to call, ensuring that critical operations are completed in a timely manner without disrupting the regular processing schedule.
The Cons of Using RabbitMQ
While RabbitMQ is a powerful messaging broker, it's important to consider its limitations in specific scenarios:
Message Persistence and Scalability
-
Persistence: RabbitMQ deletes messages once delivered, contrasting with Apache Kafka's configurable retention, allowing for historical data analysis.
-
Scalability: RabbitMQ scales vertically, requiring hardware upgrades for increased capacity, whereas Kafka scales horizontally, facilitating expansion by adding more machines to accommodate growing data volumes.
Use Case and Performance
-
Use Case: RabbitMQ is optimized for traditional messaging focusing on message delivery efficiency. Kafka, designed as a streaming platform, supports messaging, distributed storage, and data processing, handling trillions of messages more effectively.
-
Performance: RabbitMQ's performance can suffer when switching from in-memory to disk storage under heavy loads. It does not support message batching, impacting throughput, especially compared to Kafka's high-throughput capabilities.
Technical Complexity
-
Learning Curve: RabbitMQ is written in Erlang. It can be challenging for developers unfamiliar with the language. it could complicate troubleshooting and maintenance.
-
Configuration Complexity: Setting up and maintaining RabbitMQ involves navigating numerous configuration options, including queue sizes, behavior, delivery settings, and message TTL, adding to the operational overhead.
Elevate Your Messaging with RabbitMQ on VPSServer!
Are you ready to transform your messaging infrastructure into a high-performance, reliable powerhouse? VPSServer and RabbitMQ's versatility and efficiency are here to help.
Dive into the world of advanced messaging solutions with VPSServer's command line and specialized virtual servers, tailored to meet the demands of modern communication systems. Benefit from blazing-fast speeds that ensure your messages are delivered instantly, eliminating the bottleneck of sluggish performance.
Opt for VPSServer as your foundation for RabbitMQ and experience unparalleled stability, scalability, and affordability. Don't settle for less when it comes to your messaging needs. Start today with VPSServer and unleash the full potential of RabbitMQ in your applications, ensuring seamless communication and operational excellence.
Unlock the future of efficient messaging now with VPSServer and RabbitMQ!
Frequently Asked Questions
How can I access the RabbitMQ Management Interface?
Access to the default RabbitMQ Management Interface is provided through a web browser. For local installations, it's typically available at http://localhost:15672/, or a link can be found on the details page for hosted solutions like CloudAMQP.
What kind of monitoring capabilities does RabbitMQ provide?
RabbitMQ offers comprehensive monitoring features, allowing administrators to track message rates, queue length and depths, and node health, among virtual host and other metrics, to ensure the system's performance and reliability.
Can RabbitMQ be customized for specific application needs?
Yes, RabbitMQ's flexibility and extensive plugin ecosystem allow it to be customized and extended to meet specific application requirements, whether it's through custom exchange and configuration file types, user authentication methods, or storage backends.

Rimsha Ashraf is a technical content writer and software engineer (available on LinkedIn). She has written 1000+ articles and blogs and has completed over 200 projects on various freelancing platforms. She specializes in topics such as cybersecurity, cloud computing, machine learning, artificial intelligence, blockchain, and cryptocurrency.