


Simple steps to harden your SSH setup on a VPS server
Introduction
Let's imagine you have already setup a SSH key based passwordless access to your VPS server. It is already much safer, compared to traditional password-based access, however still not secure enough. In a modern world there are a lot of already well-known methods of server-targeted attacks, and there are also some methods to make your SSH server more secure. Hardening is a specific term in IT world, that is usually related to reducing the attack surface of your system. I will describe a few easy to apply ways of hardening your SSH server. Statistics show, that if some service is hard to quickly hack with generic approach, unless you are a top priority target, attacker will prefer to move to another target. So even if you use your VPS server for your hobby, development project, personal web-site or anything else, probably not looking very valuable for an attack, you still better secure your ssh connection to save a lot of time in future in case of succesfull attack.
Prerequisites
1) Centos 7.4 VPS server
2) Key based ssh access, if you have not done it yet. You can follow our guide[1] to do so.
3) Basic skills to edit linux config files and manipulate services
Change default SSH port
Change the default SSH access port.* By default ssh service is listening at port 22. Changing the default port makes a number of potential attacks much smaller, since attacker do not only have to attack your server with often automated software, but to find out the port, your SSH service listens on. Ports from 0 to 1023 are reserved for well-known ports, 1024 to 49151 are registered ports, 49152 to 65535 are dynamic/private/testing ports, so better choose the port either from the 1024 to 4951 region or from the region 49152 to 65535. Technically you can choose any port, but to avoid potential problems 49512 to 65535 is the best choice. Let's choose 49513 for example. Check if someone has already changed the port. Possibly not, if you have already accessed your VPS with a standard 22 port :)
cat /etc/ssh/sshd_config |grep Port
 As you can see, port string is commented.
Let's change it by uncommenting the string and changing the port to 49513
As you can see, port string is commented.
Let's change it by uncommenting the string and changing the port to 49513
 Just in case, check that this port is not used by any other software by running
ss -tulpn | grep LISTEN

Restart your ssh service
systemctl restart sshd
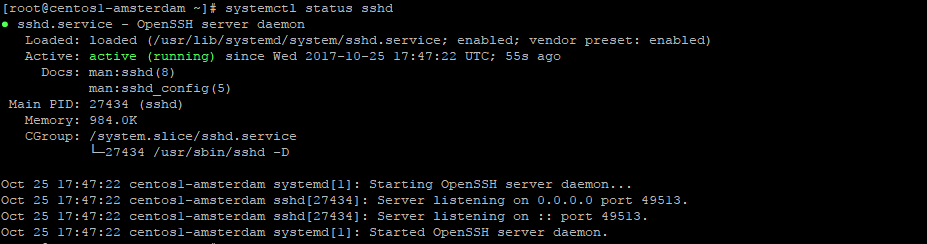
Check status of service ( that it had restarted OK ), and check that your sshd service is now listening on a new port
systemctl status sshd
 Careful! You ssh session will not be dropped immediately, but next time you will need to connect using a new port.
Disable v1 protocol
Disable v1 protocol for ssh service*
SSH supports two versions of protocols: 1 and 2. 1 is much less secure and has many vulnerabilities. Let's force ssh to use only protocol v2.
open /etc/ssh/sshd_config
and add a string
Protocol 2
restart sshd service and check it's status
systemctl restart sshd
systemctl status sshd
Disabling root login
Disabling root login, and adding a specific user to access your server* By default VPS server has a root user, so by default you are logging in with a root permissions. It is better to create a specific user for ssh access, and only after accessing system with your specific user, switch to root Let's do it: Create user and password
adduser vpsuser
passwd vpsuser
Do not forget that if you have properly setup your server password-based ssh access is already disabled. let's populate authorized keys for that user with a list of trusted keys, that you already have for root user ( and copied to newly created user ).
mkdir -p /home/vpsuser/.ssh
cat /root/.ssh/authorized_keys > /home/vpsuser/.ssh/authorized_keys
chmod 0600 /home/vpsuser/.ssh
chmod 0600 /home/vpsuser/.ssh/authorized_keys
chown -R vpsuser:vpsuser /home/vpsuser/.ssh
You can also follow the key creation tutorial from this guide[2] and repeat it for your new user.
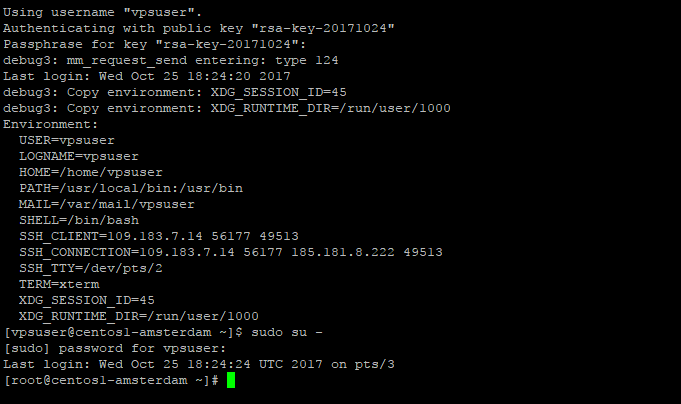
Now try accessing your machine with that user and a key, that you have previously added for root user. So now, you can access the machine with a non-priveleged user, setup a sudo access for it. By default our sudo is configured to allow password-protected sudo access for users in group wheel. Add your user to wheel group
usermod -a -G wheel vpsuser
Now, relogin to vpsuser ( required to reread groups ) and try running
sudo su -
after password prompt you should be allowed to log in as root user
 Now you can disable root login for your VPS server.
open
Now you can disable root login for your VPS server.
open /etc/ssh/sshd_config
uncomment and #PermitRootLogin yes string, and change it to PermitRootLogin no
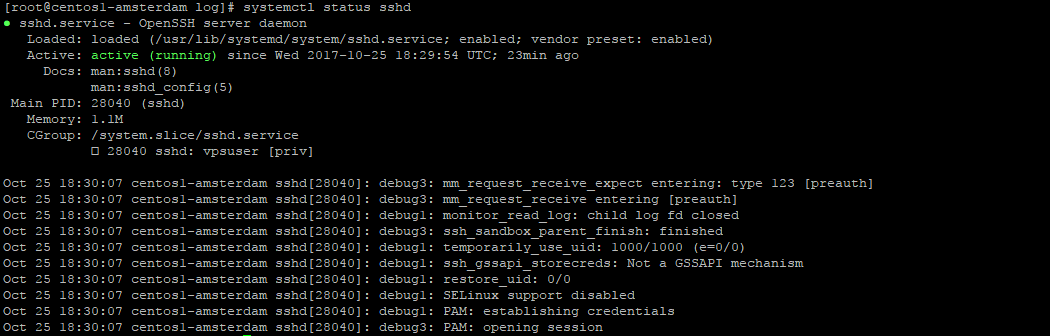
 restart sshd service. IMPORTANT: Carefully check that you can access VPS with your user, and that sudo works, prior to disabling root login and restarting sshd
systemctl restart sshd
You will immediately lose session and will have to relogin with that user, you have created, enabled key-based ssh access, and sudo priveleges.
Limit users
Limit the number of users, that can access your server:*
Let's imagine you have a lot of different unpriveleged and priveleged users on you machine.
In most cases, you want to be sure that only a certain number of users can access your machine.
For example in our case you have decided, that only vpsuser, we have created before, will ever access our VPS through ssh.
All other users, even created in future, will not be able to do it.
Open /etc/ssh/sshd_config
and add AllowUsers vpsuser string to the config file.

AllowUsers vpsuser vpsuser1 vpsuser2
You can also limit access to a specific group, using
AllowGroups group1 group2
restart ssh service and check that it is running ok
systemctl restart sshd
systemctl status sshd
Conclusion
We completed a few steps that are fast and easy to implement, to not change the behaviour of your VPS much, but noticeably harden your setup. It is recommended to always make your ssh access secure, so that your VPS server is not hacked by some kid with a generic hacking software.
[1]: https://www.vpsserver.com/community/tutorials/3917/configuring-a-secure-ssh-based-connection-to-your-vps-server/
[2]: https://www.vpsserver.com/community/tutorials/3917/configuring-a-secure-ssh-based-connection-to-your-vps-server/
Related Tutorials
Common SSH CommandsInstalling LAMP (Linux, Apache, MySql & Php) Stack on Debian 8 Server
Install LAMP (Linux Apache, Mysql Server and Php) on an Ubuntu 14.04 64bit VPS Server
SNMP Master Agent setup on Centos 7.4 and Ubuntu 17.04
Monitoring your Linux VPS usage using Munin on CentOS 7.4 and Ubuntu 17.04
comments (1)
hw
- 6 years agoNote: the directory /home/vpsuser/.ssh has the wrong permissions above, it needs to have the execute bit set in order for key authentication to work:
"chmod 0600 /home/vpsuser/.ssh"
should be
"chmod 0700 /home/vpsuser/.ssh".