


How to Setup TeamSpeak Server on Linux
Introduction
TeamSpeak is a software Voice over Internet Protocol (VoIP) that can be used for the players of online games to communicating to each others or talking directly. Using a Voice over IP software is a must if you like to play online games like first-person shooter (FPS), online RPG, MMORPG or other online games. The ability to talk directly using Voice over IP software makes it easy for you to communicate with each other without having to type to communicate.
Prerequisites
This is the prerequisites before you start the tutorial.
Create host for TeamSpeak Server in local environment or you can use vps server here[1]
SSH Client, you can download here[2]
Credential for access server using ssh client.
Installation
- Update and Upgrade Ubuntu Server
root@host-ubuntu:~# sudo apt-get update && sudo apt-get -y upgrade
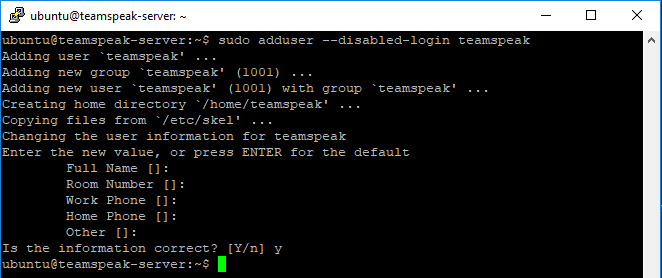
- Create New User
Option -disabled-login to limit new user permissions. In this case teamspeak user not be able to login on the system and new user created for security reason.
root@host-ubuntu:~# sudo adduser --disabled-login teamspeak
- Download TeamSpeak server
Download the teamspeak package from its website, customize it with server specifications. The download link below is the latest teamspeak version, if any newer, it can be replace.
root@host-ubuntu:~# wget http://dl.4players.de/ts/releases/3.12.1/teamspeak3-server_linux_amd64-3.12.1.tar.bz2
Next we will extract the downloaded package
root@host-ubuntu:~# tar -jxvf teamspeak3-server_linux_amd*.tar.bz2
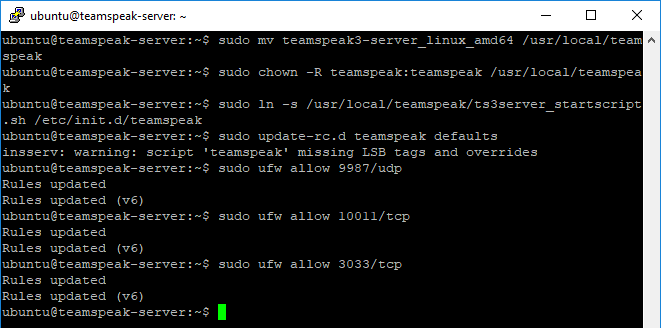
- Move File and Set Permission
To move the extracted teamspeak file to the user directory, run the command below.
root@host-ubuntu:~# sudo mv teamspeak3-server_linux_amd64 /usr/local/teamspeak
Change the owner of the directory to user teamspeak.
root@host-ubuntu:~# sudo chown -R teamspeak:teamspeak /usr/local/teamspeak
To connect the ts3server_startscript.sh file into the /etc/init.d/teamspeak directory
root@host-ubuntu:~# sudo ln -s /usr/local/teamspeak/ts3server_startscript.sh /etc/init.d/teamspeak
Next we will make teamspeak automatically run after the system boot
root@host-ubuntu:~# sudo update-rc.d teamspeak defaults
After that create some firewall rules
    root@host-ubuntu:~# sudo ufw allow 9987/udp
    root@host-ubuntu:~# sudo ufw allow 10011/tcp
    root@host-ubuntu:~# sudo ufw allow 3033/tcp
- Start Run Server TeamSpeak
Once you are done, save the file and close the editor. Now we will activate the script so that it will start on boot. check the ts3server_startscript.sh file have linked into the /etc/init.d/teamspeak directory
root@host-ubuntu:~# sudo service teamspeak start
When you first try to connect to your TeamSpeak server, you may be prompted to use a privilege key. This privilege key allows to administrate your TeamSpeak server. To get this privilege key, use the following command:
root@host-ubuntu:~# cat /usr/local/teamspeak/logs/ts3server_*
you'll see something that looks like this:
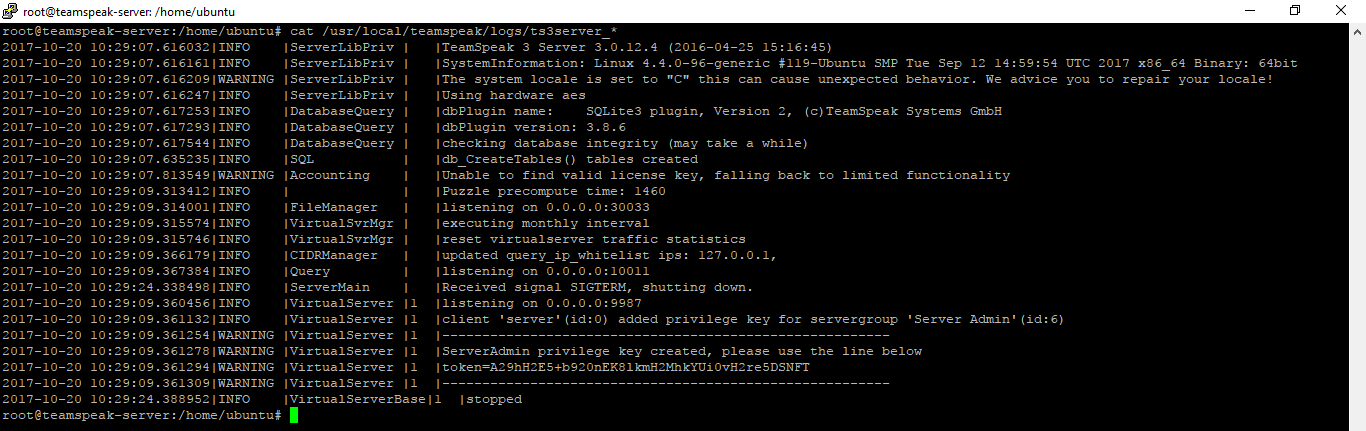
dont forget to copy token on the bottom, you'll need for client privilege key access.
How To Use TeamSpeak Client
Download and Install TeamSpeak Client
First, you need to download TeamSpeak Client 32-bit here[3] or TeamSpeak Client 64-bit here[4]. Then install TeamSpeak Client into your Windows OS. If you used another OS (macOS, Linux), you can download the TeamSpeak Client here[5].
Setup the TeamSpeak Client on Windows
Once you launch the installed TeamSpeak Client, you are requested as usual to read the disclaimer and then you need to approve it.
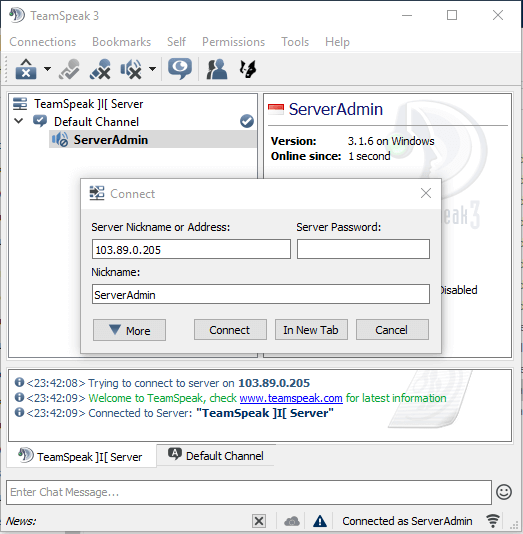
- Click Connection --> Connect in the TeamSpeak Client to connect into the TeamSpeak Server.
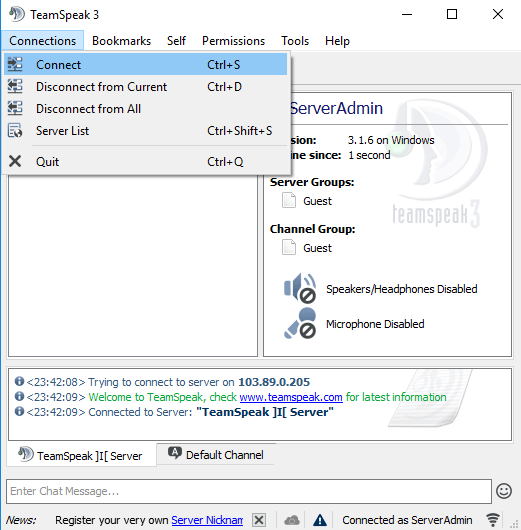
- Input Server Nickname or Address and Nickname. In this tutorial my TeamSpeak Server address is 103.89.0.205 and Nickname is ServerAdmin.
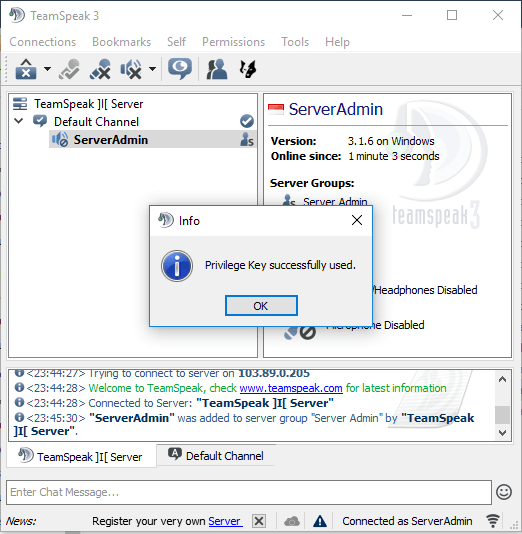
- After that privilege key tab will show, then you need to copy + paste your privilege key from TeamSpeak Server to the TeamSpeak Client.
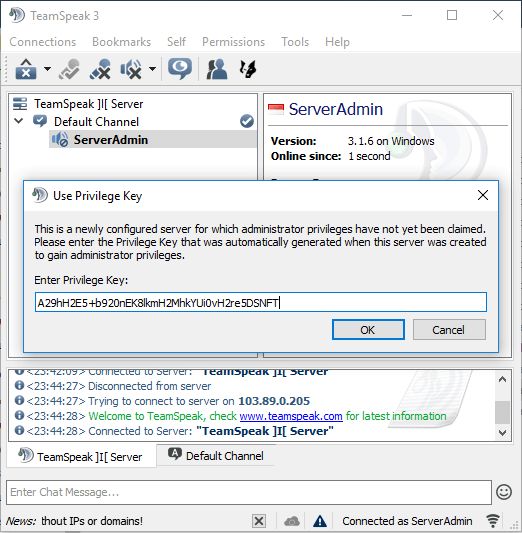
- Make sure you copy the right privilege key and if it works, it will be like the picture below.
After successfuly connect from Client to Server, you need to setup several things. The first thing you need to do when TeamSpeak Client is connect to a TeamSpeak Server.
- Choose a nickname
- Setting microphone you used
- Test your microphone
- Select plug-ins
- Select a sound pack for notifications
- Specify keyboard hot keys
All is done, now you can share the server address with the friends you want to communicate with and then start communicating :)
This is it. I hope you can understand to create TeamSpeak Server and use TeamSpeak Client from this tutorial. If you encounter any bugs or documentation errors, please comments below :)
[1]: https://www.vpsserver.com/
[2]: https://www.chiark.greenend.org.uk/~sgtatham/putty/latest.html
[3]: http://dl.4players.de/ts/releases/3.1.6/TeamSpeak3-Client-win32-3.1.6.exe
[4]: http://dl.4players.de/ts/releases/3.1.6/TeamSpeak3-Client-win64-3.1.6.exe
[5]: https://www.teamspeak.com/en/downloads/
Related Tutorials
Installing ServerPilot and Creating an App on Ubuntu 14.04 LTS 64bitLocating files on your Linux VPS system using whereis, which, whatis, readlink, find
Basic principles of tutorial SNMP (Simple Network Management Protocol)
Installing Drupal on Ubuntu 16 VPS Server
Monitoring your Linux VPS usage using Munin on CentOS 7.4 and Ubuntu 17.04
comments (2)
Marcelo
- 7 years agoVery good tutorial.
If you use newer versions of TeamSpeak 3 servers the file ".ts3server_license_accepted" is still missing.
This file must then be created in the path "/usr/local/teamspeak/".
Perry
- 6 years agoThanks for this guide. Want to leave a note for those building this on a cloud platform such as GCP. To enable this on GCP after doing this setup I had to enable a firewall rule allowing UDP on 9987 and TCP on ports 10011 and 30033