A remote desktop is a helpful tool that enables remote connection and computer operation. Administrators can access and administer the server remotely thanks to a functionality integrated into Windows Server.
In this blog post, we'll go over how to use Remote Desktop to connect to your Windows Server and set up and configure the remote connection. In addition, we'll go through the various software and tools for connecting to the server, as well as how to handle typical problems that can come up whether you need to connect to a server from a distance as a network administrator, a system administrator, or just a regular user.
-
-
How to Access Your Windows Server Using Remote Desktop
- Step 1: Enable Remote Desktop on Your Server
- Step 2: Determine the IP Address of Your Windows Server
- Step 3: Download and Install a Remote Desktop Client
- Step 4: Connect to Server Using Remote Desktop
- Supported Operating Systems
- Step 5: Adjusting Remote Desktop Settings
- Step 6: Adding Users to the List of Allowed Users
- Step 7: Troubleshooting Common Issues
- Securing your Windows server
- Using Microsoft Remote Desktop (Mac OS X versions 10.9 and later)
- Conclusion
-
How to Access Your Windows Server Using Remote Desktop
How to Access Your Windows Server Using Remote Desktop
Step 1: Enable Remote Desktop on Your Server
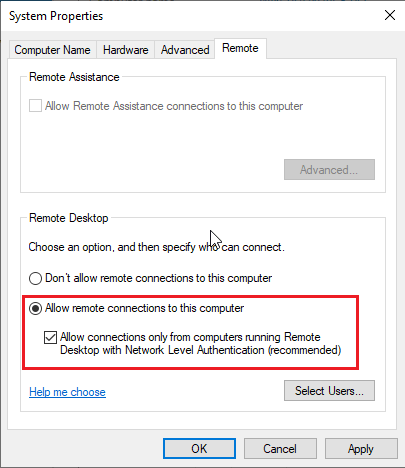
Before you can access your server using a remote desktop, you must first enable a remote desktop on the server to allow the server in accepting remote desktop connections. To do this, follow these steps:
-
Open the System Properties: Go to the Start menu, click "Run," type "sysdm.cpl," and press Enter. This will open the System Properties dialog box.
-
Go to the Remote Tab: Go to the "Remote" tab in the System Properties dialog box.
-
Enable Remote Desktop: In the Remote tab, select "Allow remote connections to this computer." This option enables Remote Desktop connections on the server.
-
Click OK.
Step 2: Determine the IP Address of Your Windows Server
You need to know your server's IP address to access your server using a remote desktop. The IP address is a unique identifier that tells you where the server is on the network. To find the IP address of your server, follow these steps:
-
On your Windows server, open the Start menu and type "cmd" in the search bar.
-
Click on "Command Prompt" in the search results.
-
In the Command Prompt, type "ipconfig /all" and press Enter.
-
Look for the "IPv4 Address" line. The number next to it is the IP address of your server.

If you want to connect to your server using Remote Desktop but are using a public IP address, there are some steps you need to follow to ensure a successful connection.
Step 3: Download and Install a Remote Desktop Client
Next, you will need to download and install a remote desktop client on the computer you want to use to access your server. A remote desktop client is a software application that allows you to connect to a remote computer and control it. Many remote desktop clients are available, including Microsoft Remote Desktop, a free remote desktop program you can download from the Microsoft Store.
Step 4: Connect to Server Using Remote Desktop
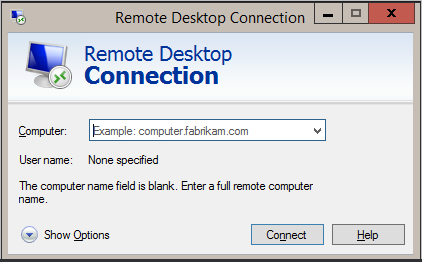
Now that you have enabled remote desktop and know the IP address of your server, you can connect to it using a remote desktop connection. Computers running remote desktop connection application can access and control another server remotely through the Remote Desktop Protocol (RDP). To do this, follow these steps:
-
Open the Remote Desktop Connection app on the computer or device you want to use to connect to the server. This app is built into Windows, and you can find it by searching for "Remote Desktop Connection" in the search bar.
-
In the Remote Desktop Connection app, enter the server's IP address or the server's hostname.
![Connect to remote Azure Active Directory-joined PC (Windows) - Windows Client Management | Microsoft Learn]()
-
Click Connect.
-
You will be prompted to enter your login credentials for the server. Enter the username and password for an account on the server that has been added to the Administrators group.
-
You should see a pop-up window with a remote session to the server if everything is set up correctly.
Supported Operating Systems
Remote Desktop is a feature available in Microsoft Windows Operating Systems that enable remote access, which allows users to connect to a remote computer and control it as if they were working on it locally. The following are the operating systems that support Remote Desktops:
-
Windows 10: Remote Desktop is available in all editions of Windows 10, including Home, Pro, Enterprise, and Education.
-
Windows 8.1: Remote Desktop is available in all editions of Windows 8.1, including Home, Pro, Enterprise, and RT.
-
Windows 7: Remote Desktop is available in the Professional, Enterprise, and Ultimate editions of Windows 7.
-
Windows Server: Remote Desktop is available in all editions of the server, including Windows Server 2016, Windows Server 2012 R2, Windows Server 2012, and Windows Server 2008 R2.
-
Mac OS X: Mac users can connect to Windows computers using Remote Desktop with the Microsoft Remote Desktop app, which is available from the Mac App Store.
It's important to note that the operating system on the remote computer must have Remote Desktop enabled, and the user connecting to the remote computer must have the necessary permissions to do so. Additionally, the Remote Desktop software must be installed on the local computer.
Step 5: Adjusting Remote Desktop Settings
Once you are connected to the server using a remote desktop, there are a few settings that you can adjust to customize your experience. To access these settings, follow these steps:
-
In the Remote Desktop Connection, click on Show Options.
-
In the Options tab, you can adjust various settings, such as the display size, color depth, and sound options.
-
You can configure options such as port forwarding and network-level authentication in the Advanced tab.
-
Make any desired changes and click Connect to save the changes.
Step 6: Adding Users to the List of Allowed Users
By default, only one user can connect to the server using a remote desktop at a time. If you want multiple users to connect to the server simultaneously, you must add them to the allowed user lists. To do this, follow these steps:
-
On the server, open the Control Panel.
-
Click on System and Security.
-
Click on System.
-
In the left-hand panel, click on Remote Settings.
-
In the Remote Desktop section, select the "Advanced" tab.
-
Click on "Select Users".
-
In the Remote Desktop Users window, click on Add Users.
Step 7: Troubleshooting Common Issues
If you are having trouble connecting to your server using a remote desktop, there are a few common issues that you can troubleshoot.
-
Incorrect IP address: Ensure you have entered the correct IP address for your Windows server. You can use the Command Prompt on the server to find the IP address.
-
Network connectivity: Make sure that the computer or device you are using to connect to the server is on the same local network as the server. If you are connecting from a remote location, make sure that you have a stable internet connection.
-
Firewall: Ensure your firewall is not blocking the remote desktop connection. You can check your firewall settings to ensure that remote desktop connections are allowed.
-
Remote Desktop Services: Make sure that the Remote Desktop Services are running on the Windows server. To check the status of the Remote Desktop Services, follow these steps:
-
Open the Control Panel on the Windows server.
-
Click on System and Security.
-
Click on Administrative Tools.
-
Click on Services.
-
Locate the Remote Desktop Services and ensure that it is running.
-
-
Remote settings: Ensure that the remote desktop is enabled on the Windows server and that the computer or device you are using to connect to the server is allowed to connect. To check the settings, follow the steps outlined in Step 1.
Securing your Windows server

A security certificate is a digital certificate to create an encrypted connection between the client and the server and confirms a website's legitimacy. A certificate authority (CA), a dependable third-party organization that issues certificates, confirms the server's or website's legitimacy before issuing the certificate.
When a client connects to a website or server with a certificate, the certificate is presented to the client. The client's browser or operating system then verifies the certificate's validity and checks that a trusted CA issued it. The client can establish an encrypted connection with the website or server if the certificate is valid and trusted.
A certificate can be used to protect Remote Desktop connections on Windows Servers. The certificate encrypts the data sent between the client and the server while establishing a remote desktop connection. This helps to ensure that private information is kept private by preventing data tampering and eavesdropping.
You must install a certificate from a reputable CA on the server to use a certificate with Remote Desktop on Windows Server. For testing, you can also use a self-signed certificate. However, this is not advised because self-signed certificates are not, by default, trusted in production situations.
Once the certificate has been installed on the server, you can enable Remote Desktop and configure it to use the certificate. To do this, follow these steps:
-
Open the Control Panel: Go to the Start menu and type "Control Panel". Click on the option in the search results to open it.
-
Enable Remote Desktop: Click "System and Security" and then click "System". Click on the "Remote Settings" tab in the System Properties window. Click the "Allow remote connections to this computer" checkbox to enable Remote Desktop.
-
Configure the Remote Desktop connection: Open the Remote Desktop Connection client on your local computer. Click on the "Options" button and then click on the "Advanced" tab.
-
Add the certificate: Click on the "Settings" button in the Advanced tab and select the "Use these RD Gateway server settings" option. Enter the server's hostname or IP address in the "Server name" field, and select the security certificate from the "Certificate" drop-down menu.
-
Connect to the server: Click the "Connect" button to establish a remote desktop connection to the server using the certificate.
Sensitive data is encrypted during remote connections using Remote Desktop with a certificate. It also aids in preventing man-in-the-middle attacks and unauthorized access to the server. For better security, it is advised to utilize a certificate when using Remote Desktop in a production environment.
Using Microsoft Remote Desktop (Mac OS X versions 10.9 and later)
The process is similar to the steps outlined above if you use a Mac OS or Windows-based machine to connect to your Windows server. You will need to use the Remote Desktop Connection client to connect to the server, and you will need to know the IP address of the server.
When connecting from a Mac OS machine, you can use the Microsoft Remote Desktop app, which is available from the App Store. You can use the Remote Desktop Connection client built into Windows when connecting from a Windows-based machine.
Here are the steps:
-
Download and install the Microsoft Remote Desktop app from the Mac App Store.
-
Launch the Microsoft Remote Desktop app and click the “+” button in the top left corner to add a new connection.
-
Enter the name of the remote computer you want to connect to and its IP address or hostname. You can also specify the user account you want to use for the connection.
-
Click “Save” to save the connection information.
-
Double-click the connection you just created to start the Remote Desktop session.
-
Enter your login credentials when prompted, then click “Connect”.
-
You will now be connected to the remote computer and can access and control it as if you were working directly.
With Microsoft Remote Desktop on Mac OS X, you can access and control your Windows Server from anywhere, providing a convenient and secure way to manage and maintain your server remotely.
Conclusion

In conclusion, utilizing Remote Desktop to connect to a Windows Server can be a helpful tool for remotely controlling, maintaining, and operating the server. Setting up the remote desktop client, configuring the remote server, and creating a secure connection between the two machines are all required steps in the procedure. You may effortlessly connect to your Windows Server from any remote place and carry out various operations as though you were physically present on the server by following the instructions in this guide. Additionally, using Remote Desktop gives you a safe and practical option to access and manage your server from a distance, allowing you to work faster and more effectively.
Overall, mastering the process of accessing your Windows Server using a Remote Desktop can greatly enhance your ability to manage and maintain your server anywhere.

Bilal Mohammed is a SOC analyst and cybersecurity expert who is passionate about making the internet safer. He has expertise in penetration testing, networking, network security, web development, and security operations center (SOC) services. In his spare time, he looks for security and design vulnerabilities to protect against attacks from hackers.
Frequently Asked Questions
What is Remote Desktop in Windows Server?
Remote Desktop is a feature in Windows Server that allows users to connect to the server from a remote location and control it as if they were sitting in front of it. This is useful for administrators who need to manage the server remotely or for users who need to access their applications and files on the server from a remote location.
Do I need any special software to access my Windows Server using Remote Desktop?
Yes, you need Remote Desktop software to connect to your Windows Server. The Remote Desktop software is built into the Windows operating system so that you can connect from a Windows computer. If you are using a Mac, you must download the Microsoft Remote Desktop app from the Mac App Store.
Can I access my Windows Server from any location?
Yes, you can access your Windows Server from any location with an internet connection. The Remote Desktop connection uses the Remote Desktop Protocol (RDP) to connect to the server, a secure and encrypted connection.
How do I find the IP address of my Windows Server?
To find your Windows server's IP address, you can use the command prompt on the server and run the “ipconfig” command. This will display the IP address of the server, which you will need to enter into the Remote Desktop Client to connect to the server.
Can I connect to my Windows Server using Remote Desktop from a non-Windows computer?
You can connect to your Windows Server using Remote Desktop from a non-Windows computer using the Remote Desktop Client for Mac or other RDP clients that support RDP connections.
Is it possible to have multiple users connected to the Windows Server using Remote Desktop simultaneously?
Yes, it is possible to have multiple users connected to the Windows Server using Remote Desktop simultaneously. However, the number of concurrent remote connections allowed will depend on the edition of Windows Server you are using and the available resources on the server.
.png)
 (1).png)