A limited handful of control panels have long controlled the web hosting market. But, as customer demands change, a solution that puts equal emphasis on outstanding performance and straightforward management is needed.
By combining multiple components, CyberPanel is a ground-breaking invention that completely transforms everything. Organizations and individuals alike may effectively manage their online presence thanks to CyberPanel's user-centric design.
-
- CyberPanel Features
- How to install CyberPanel?
- How to Access CyberPanel?
- How to use the CyberPanel dashboard?
- CyberPanel Free vs CyberPanel Enterprise
- CyberPanel Cloud
- CyberPanel Benefits and Drawbacks
LiteSpeed, an open-source control interface, is constructed using the well-established LiteSpeed web server, which is recognized for its dependable design and remarkable velocity. Adopting a user-friendly interface, CyberPanel accommodates users of differing degrees of development expertise by providing all the tools necessary for success in the dynamic web hosting industry.
Let's explore the features of Cyberpanel and how to install it.
CyberPanel Features
The features of CyberPanel go beyond just being easy to use and fast. It provides a full suite of tools to simplify your web hosting and maximize your online presence. The following are a few of the main features that make CyberPanel special:
-
LiteSpeed Web Server Integration: Harness the blazing-fast power of LiteSpeed, significantly accelerating website loading times and user experiences.
-
Built-in Caching: For enhanced performance and scalability, optimize caching at the server and page levels by utilizing the built-in LSCache and Redis.
-
User-Friendly: Irrespective of your level of expertise, the simple user interface will effortlessly carry you along.
-
Saves time Instant Deployment: With just one click, you can set up popular apps like WordPress, Joomla, and Drupal.
-
Automated Backups: Set a schedule for routine backups to safeguard data and ensure readiness for disaster recovery.
-
Built-in Caching: For enhanced performance and scalability, maximize caching at the server and page levels using the built-in LSCache and Redis.
-
Firewall: For the protection of the server against malicious threats, a firewall and intrusion detection system are installed.
-
File Administration: Use the integrated file manager to efficiently manage files using its features, such as uploading, downloading, compressing, and editing.
-
Take advantage of Let's Encrypt SSL: A free service that offers automatically renewed SSL certificates to bolster the security and credibility of your website.
-
Email Management: Use integrated tools to create and manage email accounts.
-
Subdomain and add-on domains: Manage multiple websites and domains seamlessly under one roof.
-
Database Management: Administer your remote mysql setup databases with a user-friendly interface.
-
Open-Source Advantage: CyberPanel, being an open-source project, derives advantages from a dynamic developer community that actively participates in its continuous development and enhancement. The inherent qualities of open source assure longevity, security, and transparency.
How to install CyberPanel?
A web server is required to install CyberPanel. Installing it on any Centos or Ubuntu server should work. However, virtual private servers (VPS) like VPSServer are the way to go. VPSServer unlocks CyberPanel's full potential.
Installation Requirements
Before setting up CyberPanel, ensure you have all the requirements.
-
Running AlmaLinux 8, Ubuntu 18.04, Ubuntu 22.04, Ubuntu 20.04, or CloudLinux 8 on a server with 1GB of RAM or more.
-
10GB of Storage Space.
When it comes to installing their panel, Cyberpanel provides a wealth of documentation.
here's how to install Cyberpanel:
Step 1: Start a server at any server provider, such as VPSServer, using Ubuntu 20.04, Ubuntu 18.04, Centos 7.x, or Centos 8.x.
Step 2: Launch the installation command after logging onto the server with SSH or the password; command:
sh <(curl https://cyberpanel.net/install.sh || wget -O - https://cyberpanel.net/install.sh)
This command uses cyberpanel.net to obtain install.sh, which is after that executed. This message will be displayed to you after a short while.

Step 3: Everything is OK if you see this message. Simply type in 1 and install it.
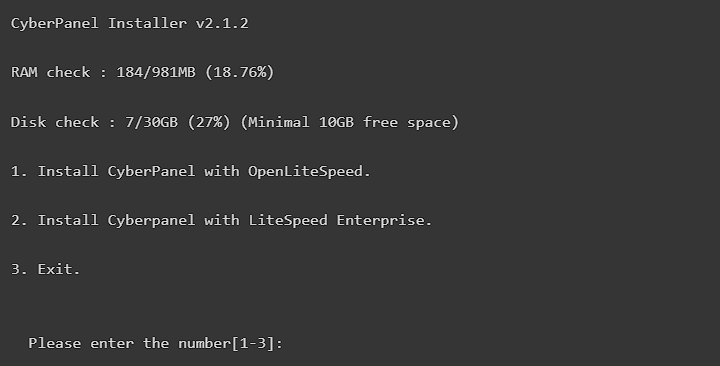
Step 4: Choose OpenLiteSpeed.
The following steps will essentially be simple: we simply click RETURN (or ENTER) to select the default options presented.
Full installation - press Enter Remote MySql - Enter (No) Version: Enter (latest).
The installer software will prompt you to choose between setting a default, random, or specified password. Feel free to select any option you like; however, we suggest against using the default.
Memcached - Yes (ENTER) Redis - Yes Watchdog- Yes
Give it a few minutes; the VPS will take about eight or ten minutes. Once installed, it will print all the information you require to use CyberPanel; simply transfer it from your terminal to a secure location on your storage device. Your password is located there.
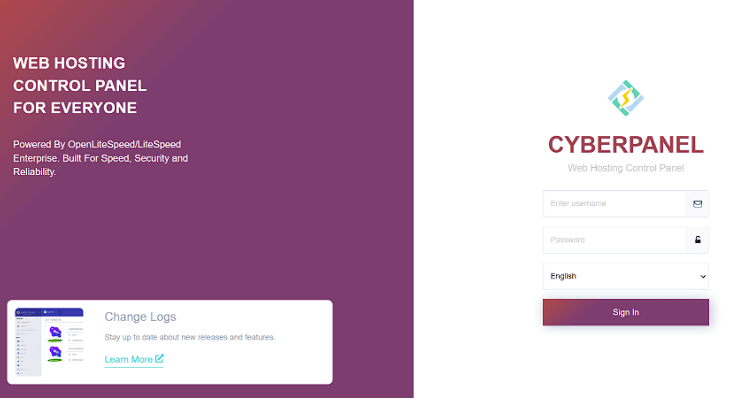
How to Access CyberPanel?

Copy the http://localhost:8090 into your browser from the file that you saved after copying your login information. You might receive an SSL warning if you copied it using HTTPS instead. That's okay; you can still view it; simply dismiss the warning and carry on.
Enter your login information now; admin is the default username.
Username: admin
Password: 1234567 or (the password you defined during installation).
When you log in, everything appears like this. Your dashboard will look like this.
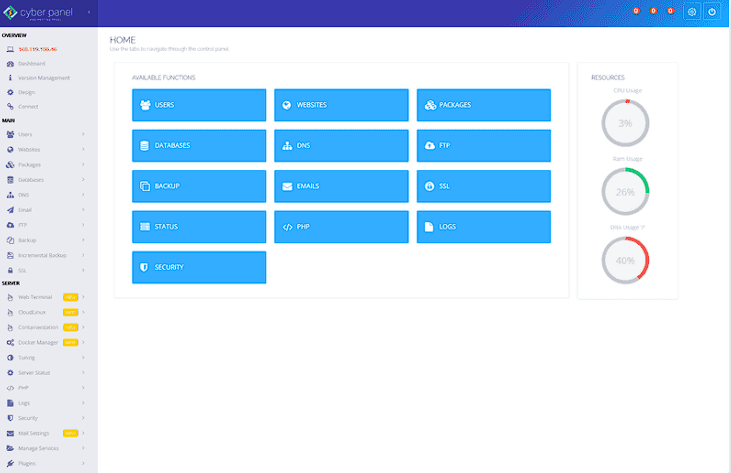
How to use the CyberPanel dashboard?
Although the CyberPanel dashboard may appear intimidating at first, it is quite simple to use. A guide to help you get started:
Main Sections
-
File Manager: Use the online interface to access and manage the files on your website. Databases: Make and coordinate website MySQL databases.
-
Website Management: Create, edit, and remove websites, as well as configure domains and install apps.
-
Protect Your Website: Plan and execute regular backups of your website's files, databases, and configurations.
-
Email: Set up mailboxes, manage existing accounts, and customize email preferences.
-
Services: Manage server services like MySQL, PHP, and FTP server.
-
Security: Configure firewall settings, install security modules, and manage SSL certificates.
-
Settings: Adjust global settings for CyberPanel, including language, theme, and user management.
Using the Dashboard
-
Navigation bar: Access different sections quickly using the navigation bar on the left side.
-
Search bar: Quickly find specific options within each section using the search bar at the top.
-
Action buttons: Each section provides various actions for tasks like creating, editing, or deleting resources.
-
Hover over icons: Hover over icons for brief explanations of their functionality.
How to Create a Website?
Creating a website using CyberPanel involves these steps:
1. Access the "Websites" Section
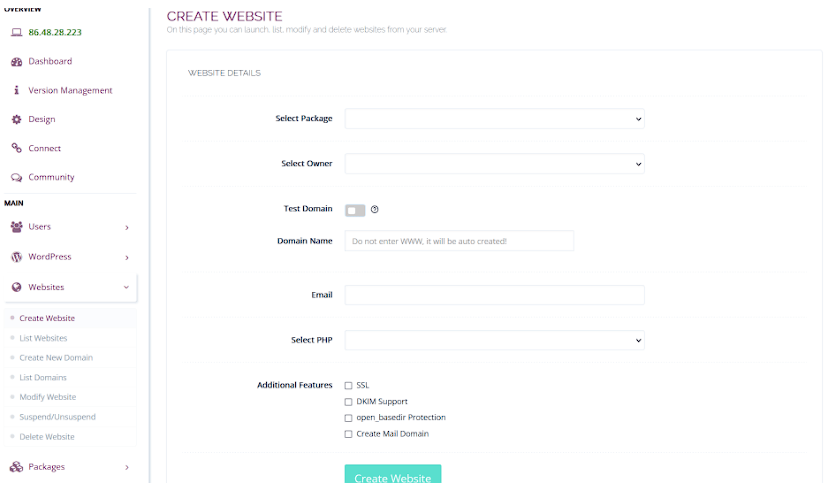
Go to the "Websites" area on the left side of your CyberPanel dashboard.
2. Add a New Website
-
Click the "Create Website" button.
-
Choose a package for your website. You can choose the default package or create a custom one.
-
Select the website's owner (admin or another user).
-
Enter your domain name and email address associated with the website.
-
Choose the desired PHP version for your website.
-
Optionally, enable additional features like SSL certificates, mail services, etc.
-
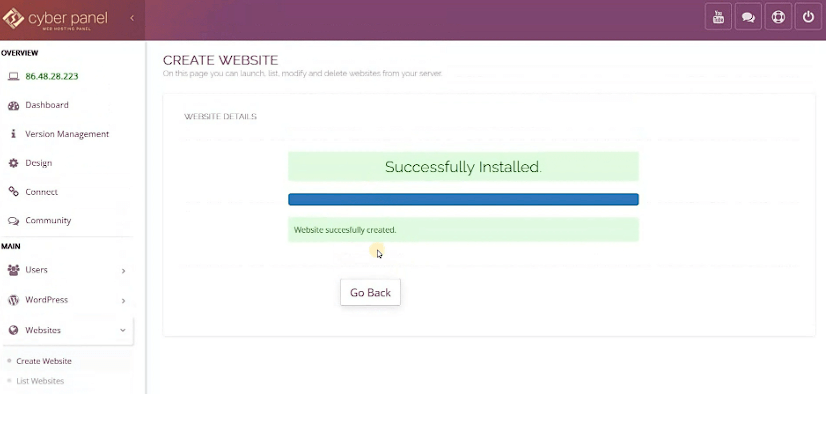
Click "Create Website" and wait for the process to complete.
-
Now, we have successfully made a website in CyberPanel! These steps must be completed regardless of the CMS you choose.
3. Manage your Website Files
Once the website is created, you can manage its files using two main methods:
-
FTP Client: Connect to your server using an FTP client. Enter your server IP address, username, and password provided by CyberPanel.
-
CyberPanel File Manager: Access it directly within the "Websites" section. This web dashboard lets you upload, download, edit, and manage website files.
4. Install a Content Management System (CMS)
-
While CyberPanel allows adding HTML files directly, using a CMS offers more flexibility and features for managing content.
-
Popular CMS options available through CyberPanel include WordPress, Joomla!, and Drupal.
-
Use the "Applications" section in CyberPanel to search and install your desired CMS with a single click.
5. Configure Your Website Settings
Each website section in CyberPanel allows you to configure various settings like:
-
Domain management: Adding subdomains, DNS records, etc.
-
Email accounts: Creating email addresses for your domain.
-
Databases: Managing MySQL databases for your website.
-
PHP settings: Adjust PHP configurations for your website.
-
Security settings: Enabling features like password protection and hotlink prevention.
6. Access Your Website
Once your website files are in place and configurations are set, you can access them at the domain name you specified during creation.
How to Manage DNS?
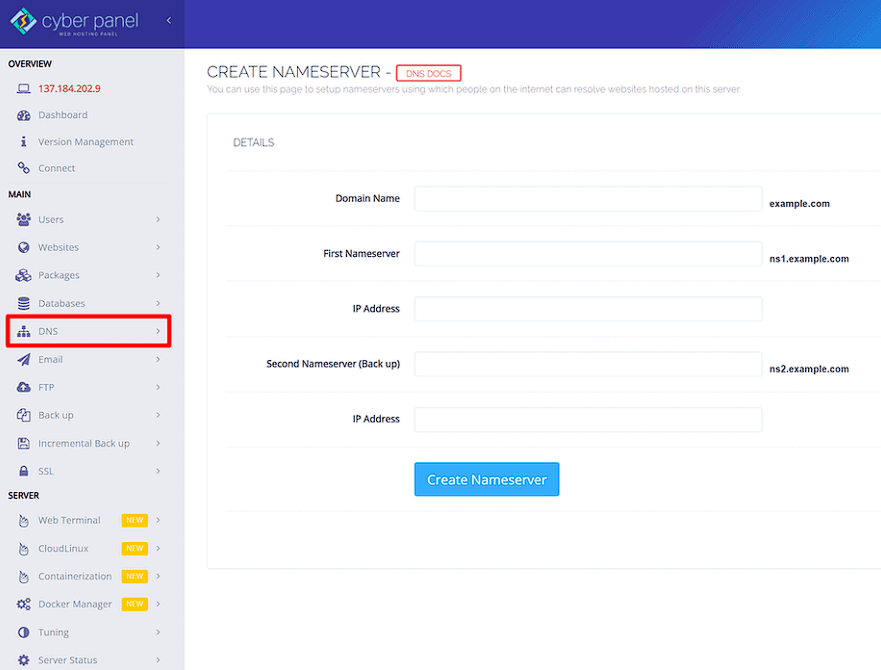
CyberPanel offers two ways to handle DNS:
First, it has its own DNS server, which you can use to set up nameservers and manage records.
Second, a DNS sync feature allows you to integrate with Cloudflare. This allows you to manage your DNS through Cloudflare while syncing local records. This is convenient since it eliminates the need to manually implement DNS changes in CyberPanel and Cloudflare.
How to Manage FTP Accounts and Databases?
CyberPanel offers convenient ways to manage FTP accounts and databases, cyberpanel control panel allows you to control access and optimize performance for your website needs. Here's a breakdown:
Creating an FTP Account
-
Go to the "Websites" section in CyberPanel.
-
Choose the site for which you want to make an FTP account.
-
Click "Manage" and then "FTP Accounts".
-
Click "Create FTP Account".
-
Choose a username and enter a strong password.
-
Optionally, set a relative path to restrict the FTP user's access to a specific directory within your website files.
-
Click "Create FTP Account".
Managing Existing Accounts
-
You'll find a list of extant accounts in the "FTP Accounts" section.
-
To access the specifics of an account, click on its username.
-
The account can be modified (password), enabled/disabled, or deleted.
Creating a Database
-
Go to the "Databases" section in CyberPanel.
-
Click on "Create Database".
-
Enter a name for your database.
-
Optionally, create a new username and password for database access.
-
Select the desired MySQL version.
-
Click "Create Database".
Managing Existing Databases
-
In "Databases" you can find all existent databases.
-
Click a database's name for details.
-
You can see information like used space, assigned users, and creation date.
-
You can also access tools like phpMyAdmin to manage the database content.
CyberPanel Free vs CyberPanel Enterprise
OpenLiteSpeed, an open-source, free alternative to LiteSpeed Web Server, is automatically installed in CyberPanel's free edition. LiteSpeed Enterprise Web Server comes included with CyberPanel Enterprise.
Here's a table summarizing the key differences:
| Feature | CyberPanel Free | CyberPanel Enterprise |
|---|---|---|
| Web Server | OpenLiteSpeed | LiteSpeed Enterprise |
| Supported Domains | Unlimited | 1 (additional licenses required) |
| Additional Features | Basic | Advanced (ESI, security, monitoring) |
| Cost | Free | Paid license |
Choosing the right version
-
Free: Ideal for personal websites, small businesses with low traffic, and those who want a free solution to explore web hosting.
-
Enterprise: Suitable for businesses with high traffic, demanding performance needs, and those requiring advanced security and monitoring features.
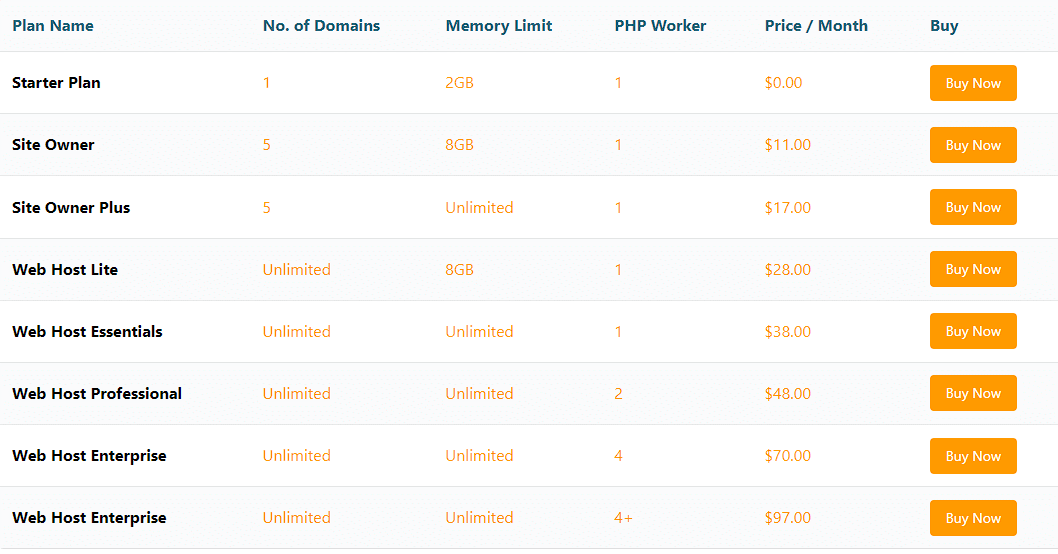
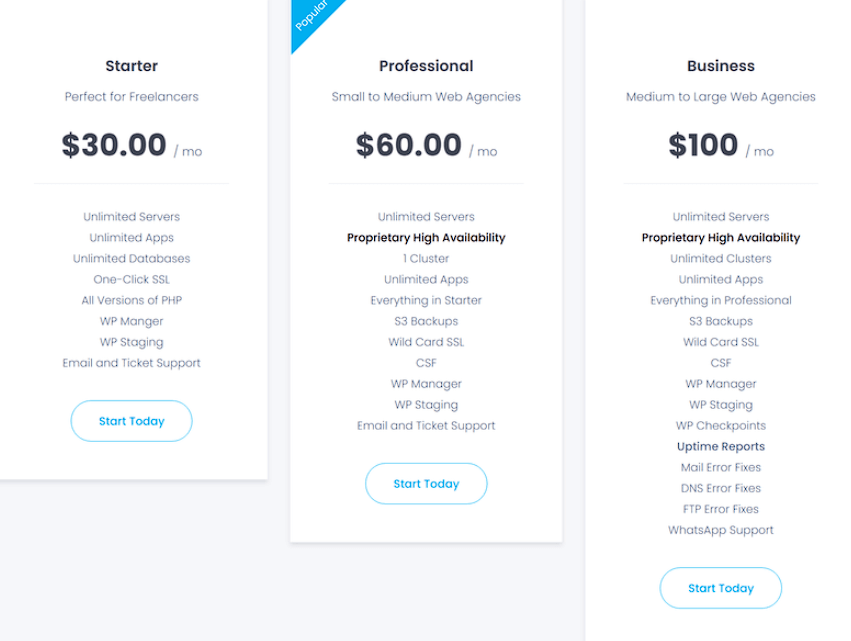
CyberPanel Cloud
The CyberPanel team's most recent product is CyberPanel Cloud. It provides an easier method to control all your CyberPanel servers from a single dashboard.
The added ease of this solution may appeal to you if you oversee numerous servers (for example, those for client sites).
The cost for CyberPanel Cloud is displayed below:
CyberPanel Benefits and Drawbacks
CyberPanel has certain benefits and drawbacks but is among the fastest and most useful web hosting control panels.
Benefits
-
Performance: It operates at a high speed, enabling you to minimize reaction times and expedite site loading.
-
Usability: You can quickly and effectively administer your website thanks to the CyberPanel control panel's very user-friendly layout.
-
Enhanced protection: With the help of CyberPanel's numerous security features, you can defend your website against harmful assaults using the Fail2ban feature, Let's Encrypt SSL certificates, and other security tools.
-
Flexibility: Scaling a web server and adding new sites is made simple with CyberPanel, allowing your business to grow easily.
-
Numerous options: You can fully personalize your website by managing DNS, backups, databases, and other factors with the many tools and services available in the control panel.
Drawbacks
-
Newer Platform: Compared to established web hosting control panels like CyberPanel server is relatively new, and its long-term stability might be a concern for some.
-
Interface: The user experience and interface are not as good as other well-known technologies, particularly SaaS server management panels.
Bottom Line
CyberPanel rocks for its user-friendly interface, free option, and speedy LiteSpeed performance. Perfect for personal sites or budget-conscious businesses! Explore VPSServer Managed VPS Hosting plans to unlock the full potential of Cyberpanel and enjoy unmatched performance and support!
Frequently Asked Questions
What is CyberPanel VPS Hosting?
Linux virtual server hosting that comes preconfigured with CyberPanel and hosting reseller features is called CyberPanel hosting.
Can I switch hosting companies while using CyberPanel?
Yes, but be mindful that CyberPanel features may vary between hosting providers. Ensure the new host supports both the software and your Linux distribution to maintain compatibility.
What operating systems does CyberPanel support?
CyberPanel currently supports Linux operating systems such as CentOS, Ubuntu, and Debian.

Rimsha Ashraf is a technical content writer and software engineer (available on LinkedIn). She has written 1000+ articles and blogs and has completed over 200 projects on various freelancing platforms. She specializes in topics such as cybersecurity, cloud computing, machine learning, artificial intelligence, blockchain, and cryptocurrency.