


Enabling sudo for your user on Ubuntu 17.04 and CentOS 7.4
Introduction
Accessing your VPS server directly with a root user is considered to be an unsecure method.
If you work from the root user all the time, you can easily make a small mistake and render hours ( if not all ) of your work useless.
The preferred method of working with your server is setting up an unpriveleged user + setting up sudo for it, so you generally monitor and work
with your server using non-priveleged access and only execute specific commands with a super user access, or sudo.
Sudo means "substitute user and do", so basically it allows your user to execute a command from another user. By default sudo is running commands from root user, however you may use it to run command from another unpriveleged user as well. Default configuration file for sudo is /etc/sudoers
Many systems approach a more secure control mechanism, by letting only an unpriveleged user to login, and, then, running commands, requiring priveleged access by executing sudo.
simple usage
yum is a good example of command, that is executed from a priveleged user. to install mc package with a priveleged access simply run
sudo yum install mc
You will be prompted to enter password ( if passwordless sudo is not set up ), and command will be executed by root user. You can also edit the file, accessible only by root, with the help of sudo, for example
sudo vi /etc/resolv.conf
Prerequisites
1) Centos or Ubuntu Linux system 2) Basic knowledge of Linux commands and file editing
Ubuntu 17.04
Ubuntu system out of the box, allows sudo for all users in sudo group. To confirm you may simply run
cat /etc/sudoers |grep %sudo
and see the following string.

Let's create an unpriveleged user
run useradd <yourusername>
for test purposes i'll user a name "vpsuser", replace it with whatever you want after creation of the user, setup a password for it.
passwd <yourusername>
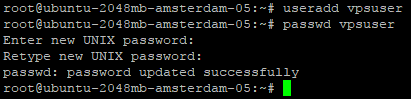 add your user to sudo group with the command
usermod -a -G sudo <username>
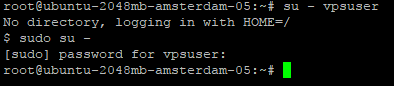
 Now, if you were previously logged in with that user in the other windows, you need to relogin with it, to have changes applied.
test that sudo is working
Now, if you were previously logged in with that user in the other windows, you need to relogin with it, to have changes applied.
test that sudo is working
sudo su -
enter your password and you should be logged in as root user
 By default sudo is enabled with a password for your user, if you want to setup a passwordless sudo access, just edit
/etc/sudoers so that string, starting with %sudo looks like
By default sudo is enabled with a password for your user, if you want to setup a passwordless sudo access, just edit
/etc/sudoers so that string, starting with %sudo looks like
cat /etc/sudoers |grep %sudo
%sudo   ALL=(ALL) NOPASSWD: ALL
 Now you can use sudo without a password
 Warning: I do not recommed enabling access to sudo without a password
Centos 7.4
Process is Centos is very similar to Ubuntu with a minor differencies. By default Centos systems allow sudo access to user in wheel group. To confirm it run
cat /etc/sudoers |grep %wheel
 create an unpriveleged user
useradd <username>
for test purposes i'll use a name "vpsuser", replace it with whatever you want After creation of user, change password for it
passwd <username>

Add user to %wheel group
usermod -a -G wheel <username>
 If you were previously logged in with that user, relogin with it, so that settings are applied
Check that sudo is available for that user. run sudo su - and enter user password on demand.
By default password is required, to enable password-less access ( which is not recommended ), edit /etc/sudoers so that
%wheel string looks like this
If you were previously logged in with that user, relogin with it, so that settings are applied
Check that sudo is available for that user. run sudo su - and enter user password on demand.
By default password is required, to enable password-less access ( which is not recommended ), edit /etc/sudoers so that
%wheel string looks like this
cat /etc/sudoers |grep %wheel
 You can also instead of previous step just uncomment
%wheel ALL=(ALL) NOPASSWD: ALL string
and comment
wheel ALL=(ALL) ALL
Warning: I do not recommed enabling access to sudo without a password
Conclusion
Now you know how to setup a sudo for your user on Centos and Ubuntu and run your commands using sudo. Consider this a safer option, compared to always working as root user, and better spend a couple of minutes to setup an unpriveleged user and sudo for it.
Related Tutorials
Installing ServerPilot and Creating an App on Ubuntu 14.04 LTS 64bitInstall Percona Server 5.7 MySQL on Ubuntu, CentOS or Debian
How to install ISPConfig panel on a VPS - Alternative of cPanel - free cPanel
Install LAMP (Linux Apache, Mysql Server and Php) on an Ubuntu 14.04 64bit VPS Server
Ubuntu 16.04 VPS LAMP + HTTP/2