


How to Create, Push and Pull Local Repository to Remote Using Git
Introduction
In 2005, Linus Torvalds made Git and since then Git is actively managed by Junio ​​Hamano, a programmer from Japan. Git is one of the most popular version control systems and there are millions of projects worldwide that use Git for its version control (commercial and open source) projects.
Some advantages of using Git:
Version control system is distributed, Git uses peer to peer approach, unlike others like Subversion (SVN) using client-server model.
Git allows developers to have a branch of code that is independent and massive.
Create, delete and merge branches becomes faster and smoother.
Git uses data models that help to ensure any cryptographic integrity exists in the repository. Every time a file is added or committed, Git will create a checksum for that.
Another feature in Git is the staging area or index. With the stagin area, the developer can format commit and make it reviewable before it is actually implemented.
Git is very simple to use. To get started, you can create an existing repository or checkout. After installation, you can use git init command to setup everything. Additionally, the git clone command can create a copy of the local repository for the user.
Prerequisites
This is the prerequisites before you start the tutorial.
Create host for git in local environment or you can use vps server here[1]
SSH Client, you can download here[2]
Credential for access server using ssh client.
Installation
This is the easiest way to install git on linux, just following the command:
- For Debian / Ubuntu
root@host-ubuntu:~# apt-get install git
- For Fedora / CentOS / Scientific
root@host-centos:~# yum install git
For Windows, you can download here[3] then open the file to run the installation process. Follow all instructions, click Next and Finish until all installation process is complete.
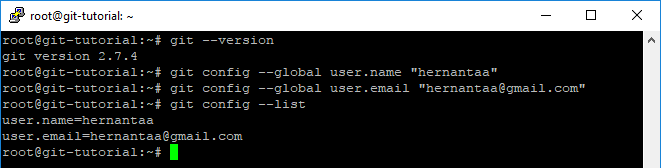
Run the command below to ensure that the installation has been successful.
root@host-ubuntu:~# git --version
- Run the following command in your terminal to configure email and username used for your Git. Username and email must be corresponding with your GitHub account. If you don't have GitHub account, you can create here[4].
root@host-ubuntu:~# git config --global user.name "hernantaa"
root@host-ubuntu:~# git config --global user.email "hernantaa@gmail.com"
- Check the configuration with the following command:
root@host-ubuntu:~# git config --list
Create GIT Repository
You can take a Git project through 2 main approaches. The first way is to take a project or directory available to put in Git. The second way is to clone / duplicate from an existing Git repository from the server. In this tutorial we will create a new repository.
Some options of git init command:
| Options | Function |
|---|---|
| -q, --quiet | Show error and warning messages but all other output will not shown. |
| --bare | Repositories created with --bare option are called bare repository. |
| --template= |
To determine templates directory which will be used. |
| --separate-git-dir= |
By default the .git directory is stored in the same directory of working tree. | | | This option function is to separate the .git folder out of working tree. |
| --shared[=(value)] | This option function is to be shared git repository amongst several users and allows users |
| in the same group to push into the same git repository. |
The option can have the following values, defaulting to group if no value is given:
| Options | Function |
|---|---|
| umask (or false) | The default permissions will be set as umask, if the --shared option is not specified. |
| group (or true) | If you create a specially group-writable for all the developers, its means the repository |
| writable for the group-writable. Then change the umask to 002 for all developers user, so that | |
| new files can created with group-writable permissions. | |
| all (or world or everybody) | Make the git repository readable for all users. |
| 0xxx | 0xxx is an octal number to set permissions for user and group access. For example : if you set |
| permissions to 0640, it will create a repository only for group-readable, not group-writable or | |
| accessible to others. But if you set permissions to 0660, it will create a repository readable | |
| and writable to the current user and current group, but inaccessible to others. |
- First, you need to create directory for your git project.
root@host-ubuntu:~# mkdir git-tutorial
root@host-ubuntu:~# cd git-tutorial/
- The following command will create a repository in the current directory.
root@host-ubuntu:~/git-tutorial# git init .
Git will create a new subdirectory named .git which will contain all the important files from your repository, which is the repository framework from Git. At this point, nothing from your project has been monitored yet.

Basic Operation
- git status
- Type the git status command to see what the current state of your project.
root@host-ubuntu:~/git-tutorial# git status
- Created a file called test.txt in the git-tutorial repository.
root@host-ubuntu:~/git-tutorial# touch test.txt
- You should run the git status command again to see how the repository status has changed:
root@host-ubuntu:~/git-tutorial# git status

Git status says test.txt is "untracked". That means Git sees that test.txt is a new file. To tell Git to start tracking changes made to test.txt, you need to add it to the staging area by using git add command.
- git add
- Type the git add command to add test.txt to the staging area.
root@host-ubuntu:~/git-tutorial# git add test.txt
- Run git status again to see the changes.
root@host-ubuntu:~/git-tutorial# git status
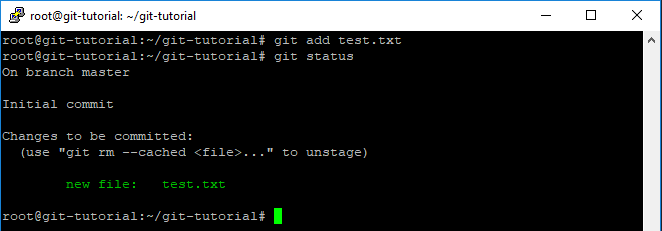
Now test.txt file is in the staging area, but test.txt file isn't in our repository yet. You could add or remove files from the staged before you store the files to the repository. To store the files in staging area to the repository, you should run the git commit command.
- git commit
- To store the files in staging area to the repository, you should run the git commit command.
root@host-ubuntu:~/git-tutorial# git commit -m "create test.txt"

Now, you've added the test.txt file to the repository.
- git log
To view history after we add and commit test.txt file to repository, you can use git log command.
- Run git log command to see the log.
root@host-ubuntu:~/git-tutorial# git log

Push Local Repository to The Remote Repository (GitHub)
- First, before you push your local repository, you need to create a repository on GitHub.
- Login to GitHub then add New repository.

- Input the repository name then click Create repository.

Now, you've new repository on GitHub called "git-tutorial".
- Don't forget to copy your repo url.

- To push local repo to the GitHub server, you need to add a remote repository.
- Go ahead and run git remote add with the options below:
root@host-ubuntu:~/git-tutorial# git remote add origin https://github.com/hernantaa/git-tutorial.git
- Push your local repository to GitHub by run the command below, then input your username and password on GitHub.
root@host-ubuntu:~/git-tutorial# git push -u origin master

The name of remote is origin and the default local branch name is master. The -u tells Git to remember the parameters, so that next time we can simply run git push and Git will know what to do.
- Check the result on your GitHub repository.

Clone Existing Repository From GitHub to Local
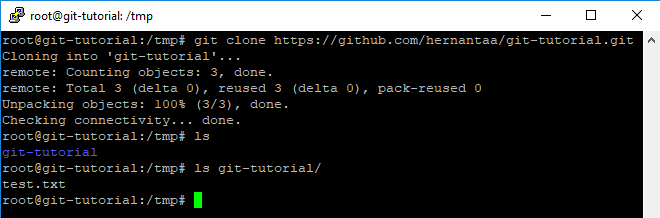
After push local repo to GitHub, if you want to make a copy of an existing Git repository, the command you need is git clone.
- Clone git-tutorial repository from your GitHub repository to the new host by simply run the command below.
root@newhost-ubuntu:~# git clone https://github.com/hernantaa/git-tutorial.git
- Check the clone repository. Then you'll see the test.txt file.
root@newhost-ubuntu:~# ls git-tutorial
This is it. I hope you can understand Git from this tutorial. If you encounter any bugs or documentation errors, please comments below :)
[1]: https://www.vpsserver.com/
[2]: https://the.earth.li/~sgtatham/putty/latest/w32/putty.exe
[3]: https://git-scm.com/download/win
[4]: https://github.com/